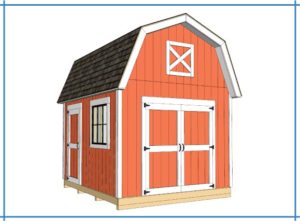
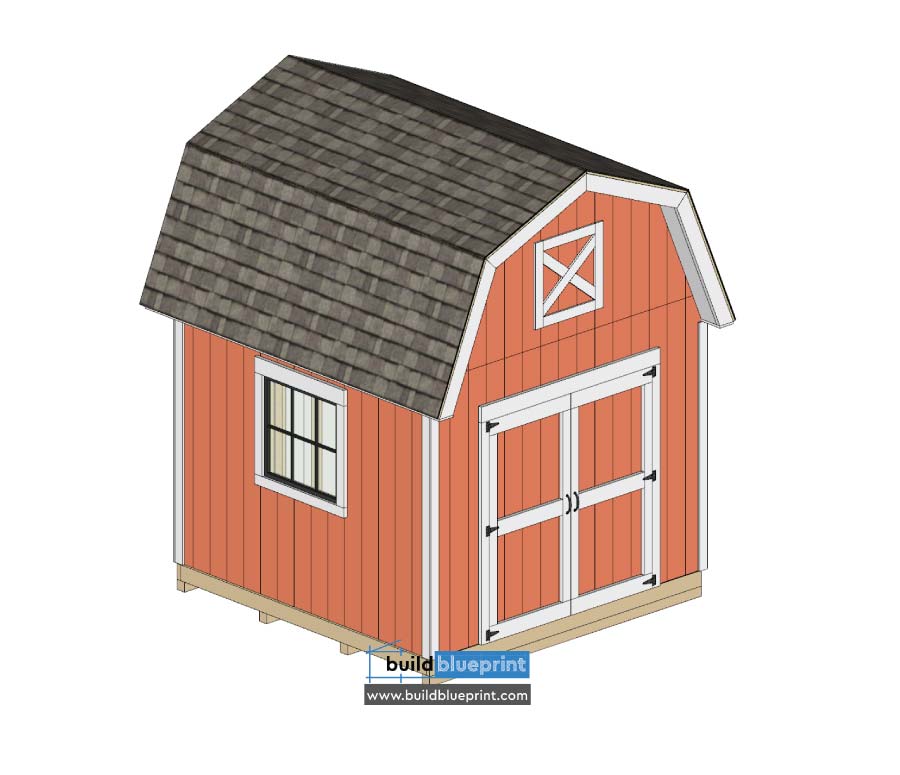
10×10 Barn Shed Plans | Free DIY Woodworking Guide
Material and Cut List
FLOOR
9 – 2×6 Pressure Treated Lumber: 9′-9″
2 – 2×6 Pressure Treated Lumber: 10′
4 – 4×4 Pressure Treated Lumber: 10′
4 – 23/32″ Tongue and Groove Plywood 4′ x 8′ Sheet (100SF)
WALLS
45 – 2×4 Lumber: 7′-4 1/2″
6 – 2×4 Lumber: 9′-5 ”
6 – 2×4 Lumber: 10′
SIDINGS
11 – 4′ x 8′ Plywood Siding Panel T1-11 (350SF)
TRUSS
18 – 2×6 Lumber: 4′-6 1/8″
18 – 2×6 Lumber: 4′-0″
4 – 2×4 Lumber: 3′-5 1/4″
4 – 2×4 Lumber: 4′-3 3/4″
24 – 2×4 Lumber: 8 1/2″
2 – 2×4 Lumber: 10′-0″
Wooden Gussets
PURLIN & ROOF
4 – 2×4 Lumber: 9′-9″
7 – 4′ x 8′ 1/2″ Plywood Sheet (210SF)
Roof Underlayment (210SF)
3-Tab Roof Shingles (210SF)
TRIM
8 – 1×4 Lumber: 7′-2 1/4″
HARDWARE
3 1/2″ Galvanized Steel Nails
2″ Deck Screws
2″ Galvanized Finishing Nails
1 1/2″ Drilling Roofing Screws
DOUBLE DOOR FRAME
2 – 2×4 Lumber: 6′-3 1/2″
6 – 2×4 Lumber: 7 1/2″
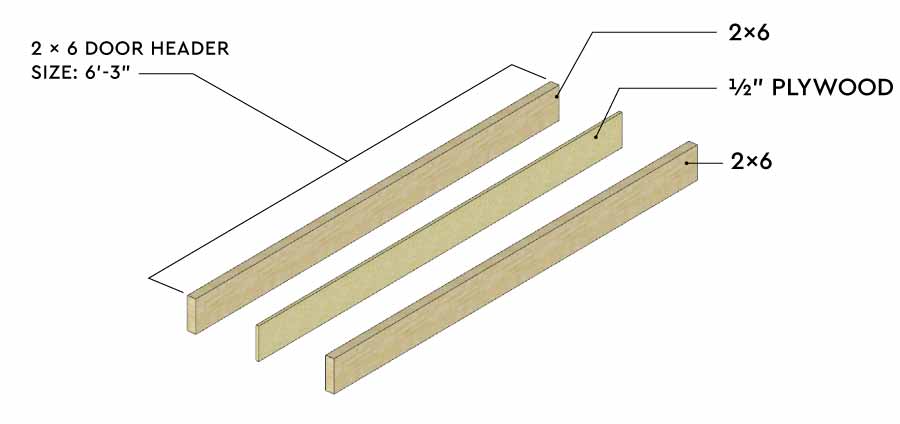
2 – 2×6 Lumber: 6′-3″ (door header)
1 – 2×6 Plywood Filler: 6′-3″ (door header)
1 – 2×6 Lumber: 6′-7″ (door trim)
2 – 2×4 Lumber: 6′-5″ (door trim)
DOUBLE DOOR
4 – 2×6 Lumber: 3′
2 – 2×6 Lumber: 2′ 5″
4 – 2×4 Lumber: 5′ 6″
2 – 4′ x 8′ Plywood Siding Panel T1-11: 6′-5 3/4″ x 3′-0″
2 – Door Handle or Latch
6 – 3 1/2 in. x 5/8 in. Door Hinge
WINDOW (optional)
2 – 2×6 Lumber: 3′-2 3/8″ (header)
2 – 2×4 Lumber: 3′-2 3/8″
4 – 2×4 Lumber: 7′-4 1/2″
2 – 2×6 Lumber: 3′-6 3/8″ (window trim)
2 – 2×4 Lumber: 2′-11 1/4″ (window trim)
1 – 35 3/8″ x 35 3/8″ Single Hung Vinyl Window
10×10 Barn Shed Plans & Instructions
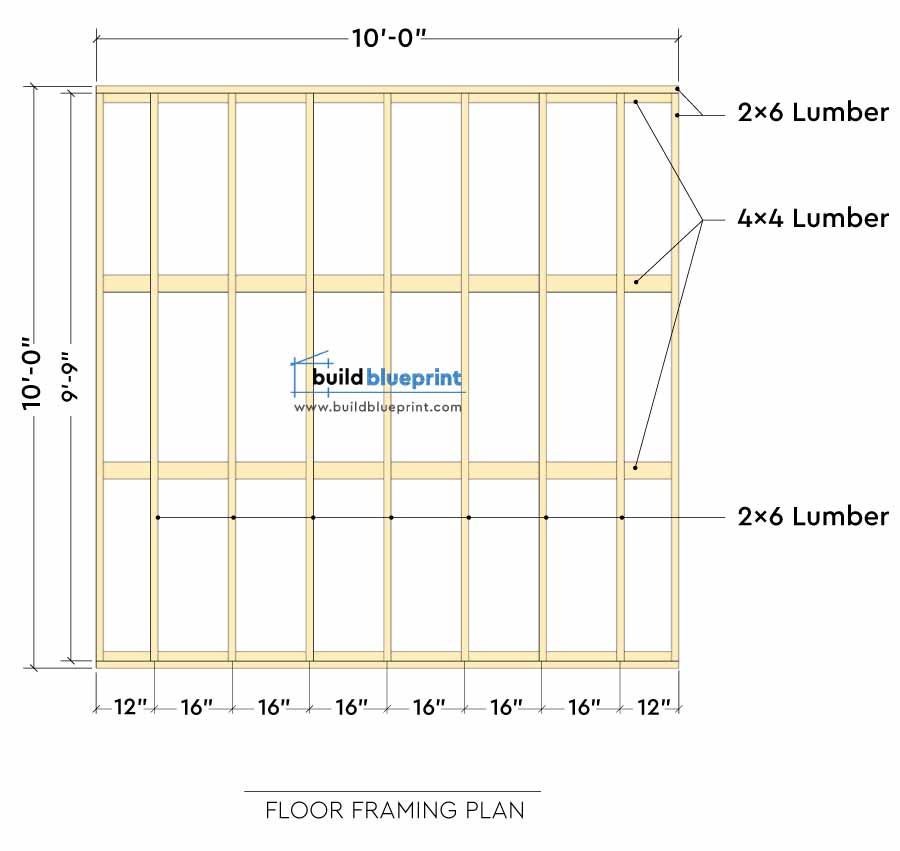
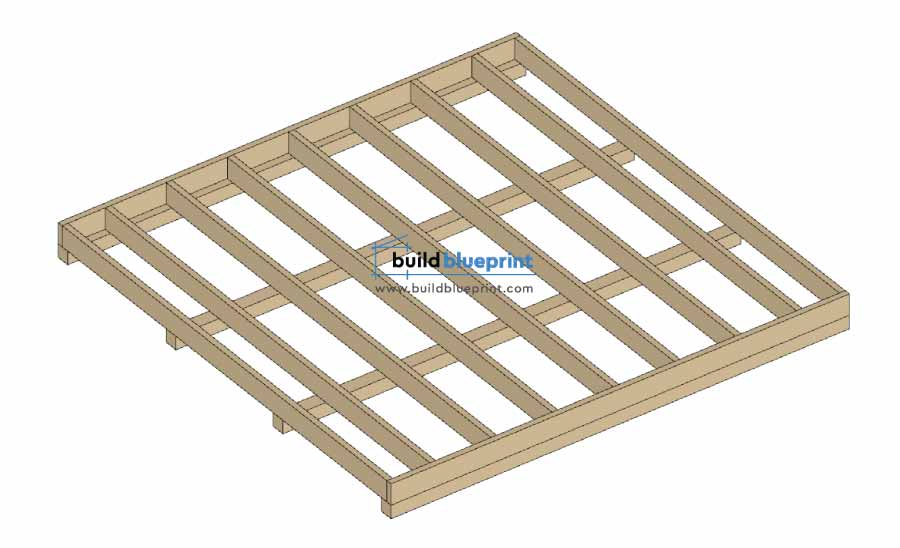
Step 1 – Foundation and Floor
At first, select a proper site for the barn shed foundation, ideally a flat solid surface away from any large trees.
To begin with, cut nine 2×6 lumbers to 9′-9″ length, and two 2×6 lumbers to 10’0″. Then, place the four 10′ 4×4 lumbers parallel to each other evenly spaced apart. At this point, assemble the four 2×6 perimeter frame on top, this will outline the overall floor frame. Afterwards, drill pilot holes through the joists and secure with 3 1/2″ screws. Finally, install the seven 2×6 floor joists at 16″ O.C., and 12″ O.C. near the sides.
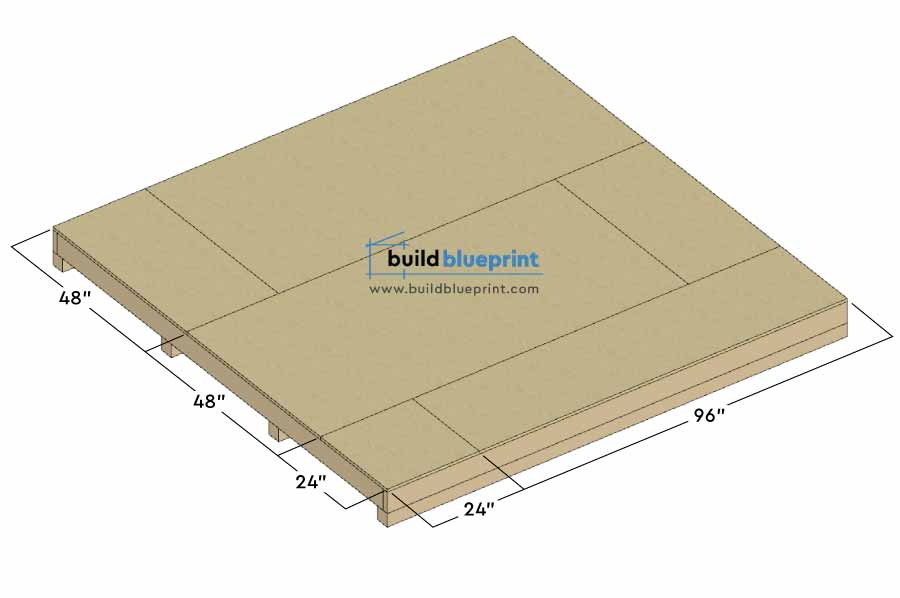
Now that the floor frame is secured, cut the tongue and groove 23/32″ plywood to size and attach to the frame. In general, you’ll need about 4 full sheets to cover the 100SF floor area, these sheets usually come in standard sizes of 48″ x 96″. Then, insert 2″ deck screws every 8″ along the joint, don’t leave any gaps between the sheets. As can be seen in the cut pattern and dimensions illustrated below:
Step 2 – Walls
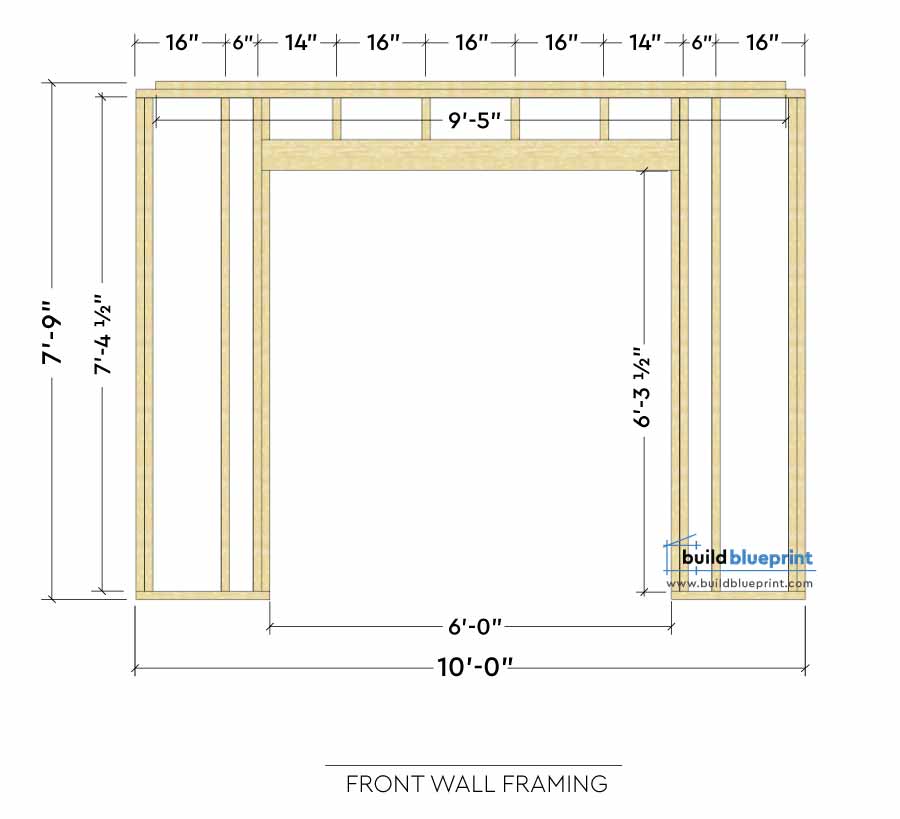
In this case, we will start with the barn shed’s front frame first, all lumbers used here are 2×4’s (except the door and window header which are 2×6’s).
At first, cut two 2×4 to 10′ in length, these will be used for the top and bottom plates. Then, cut eight 2×4 to 7′-4 1/2″ for wall studs, these will be placed 16″ O.C. You’ll also need to cut out a 9′-5″ 2×4 for the double top plate. Afterwards, drill pilot holes through the plates and insert the 3 1/2″ screws into the studs to secure in place. Finally, align the frame edges and make sure all corners are flush for a professional result.
See detailed Door and Window framing plans compatible with this 10×10 barn shed plans:
Double Door Plan
Window Plan
The 2×4 studs holding up the door header need to be cut at 6′-3 1/2″.
In order to build the door header, cut two 2×6 lumber to 6′-3″ length, and insert 1/2″ plywood as filler. Then, use wood glue and 3 1/2″ nails to secure all the pieces together.
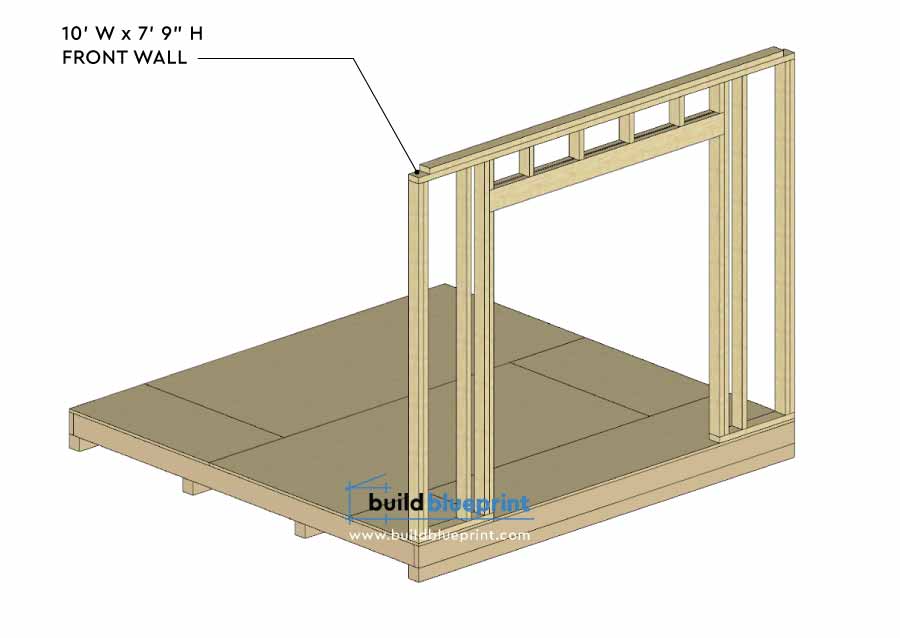
Following completing the front wall frame, align the finished front wall frame with the front edge of the floor foundation:
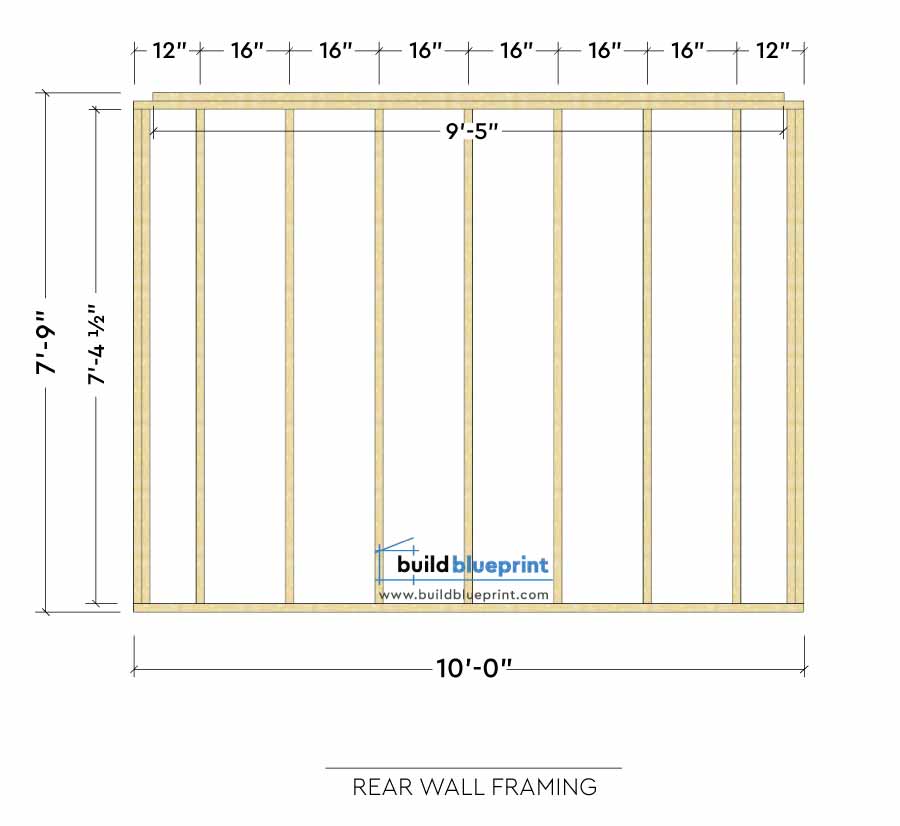
Next up is the building the barn shed’s back wall. Firstly, cut two 2×4’s to 10′ length, and 11 more 2×4’s to 7′-4 1/2″ length. Then, cut out a 9′-5″ 2×4 as the double top plate.
After that, space the wall studs to 16″ O.C., identical to the front wall. Then, drill pilot holes through the plate and insert 3 1/2″ screws to secure the studs. Follow the framing plan below.
Now that the front and back walls are completed, let’s start assembling the 2 side wall frames. To begin with, Cut two 2×4’s lumber to 9′-5″ as top and bottom plate, then a full 10′ 2×4 as the double top plate. Then, cut 12 2×4’s to 7′-4 1/2″ for the wall studs. In case you need more natural light or ventilation into the barn shed interior, add more windows on the side or back wall using similar door and window opening plans illustrated below.
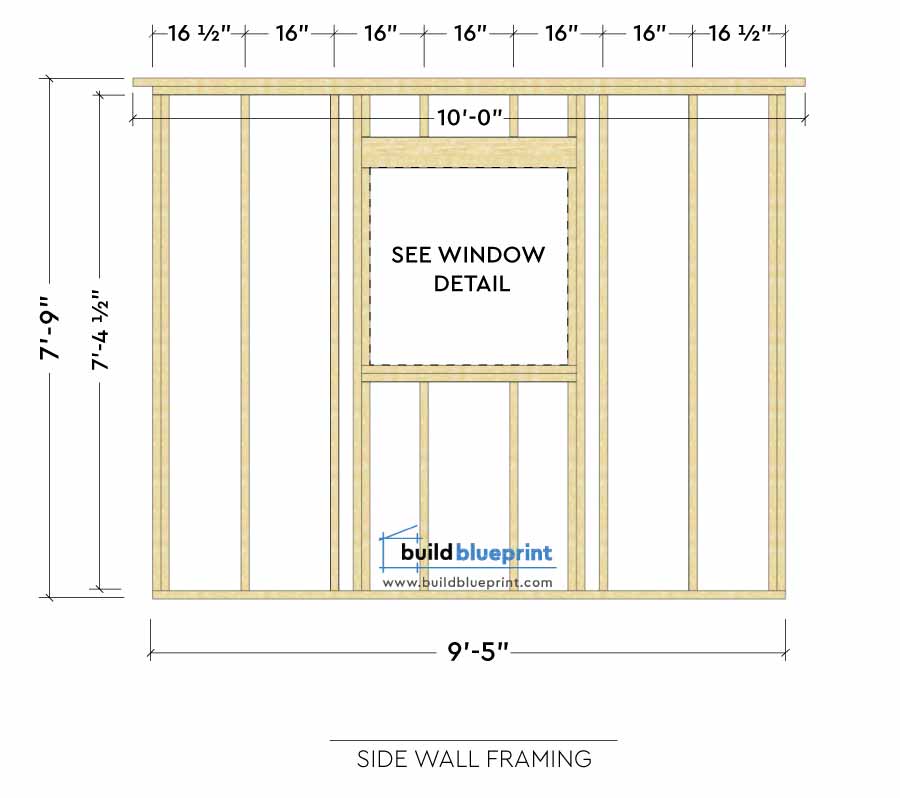
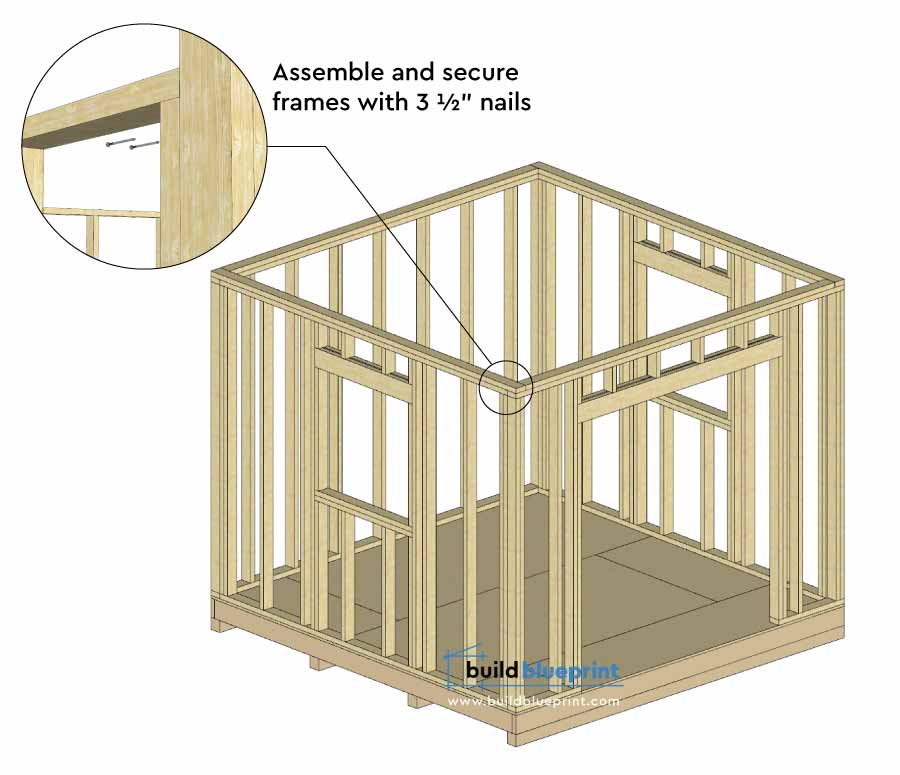
Now it’s time to secure all four wall frames together for your 10×10 barn shed. At first, line up the edges of the front and side wall frame with the floor frame perimeter. In addition, make sure edges line up and there’s no gaps, use a spirit level if needed. Then, drill pilot holes through the bottom wall plate, and insert 3 1/2″ screws to secure wall frame to the floor. Finally, lock the adjacent walls together by inserting 3 1/2″ screws or nails.
Repeat and assemble all 4 wall frames following the illustrated plan below:
Step 3 – Roof & Truss
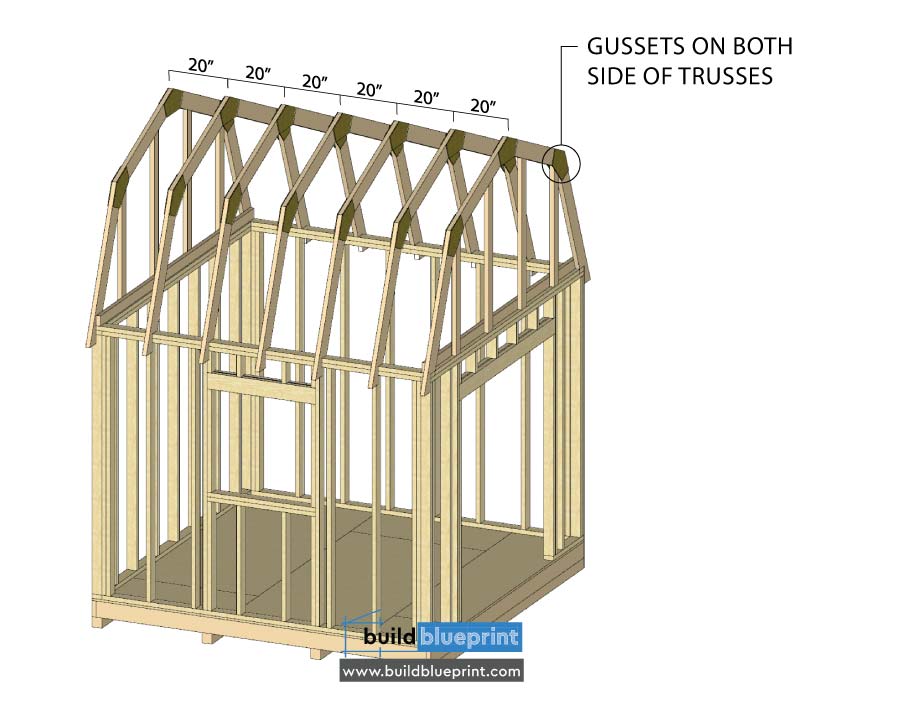
As can be seen, the most defining visual characteristic of a barn shed is the Gambrel style roof. Gambrel roof designs have several advantages, their shape provides more storage space without the extra cost and added labor. Our 10×10 barn shed will require a total of 7 gambrel trusses, installed at 20″ O.C. on top of the wall frames.
Refer to the Gambrel truss and gusset details below for dimensions and assembly instructions. In general, these truss details will fit any barn style shed with 10′ overall width.
Tip: make a single truss structure first and make sure everything fits in place.
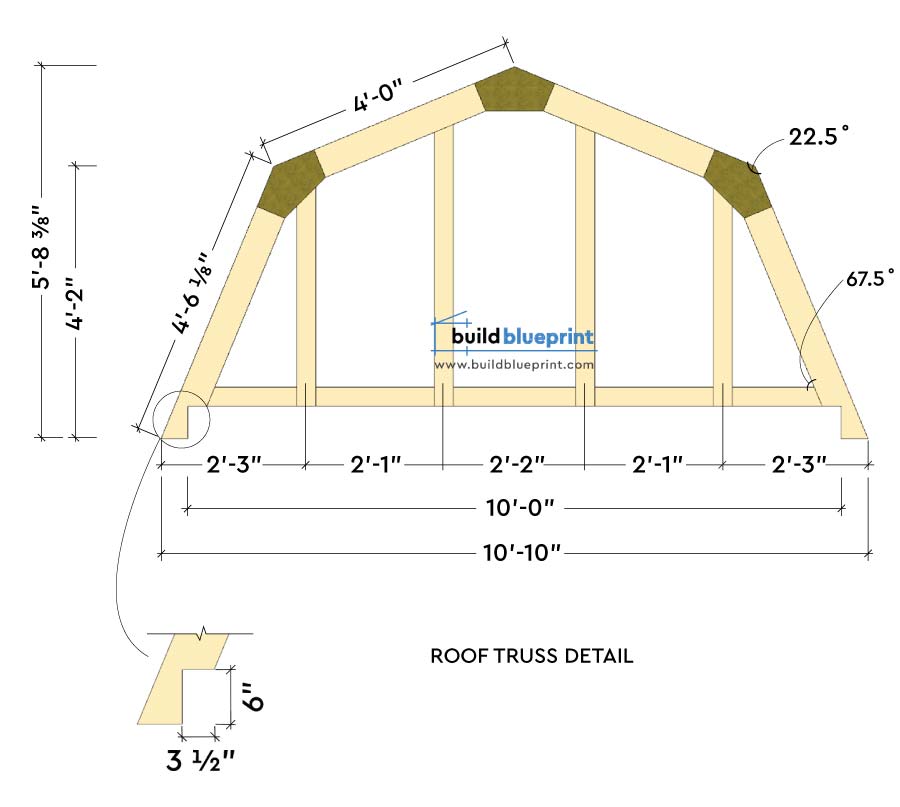
End Gambrel truss cut dimensions:
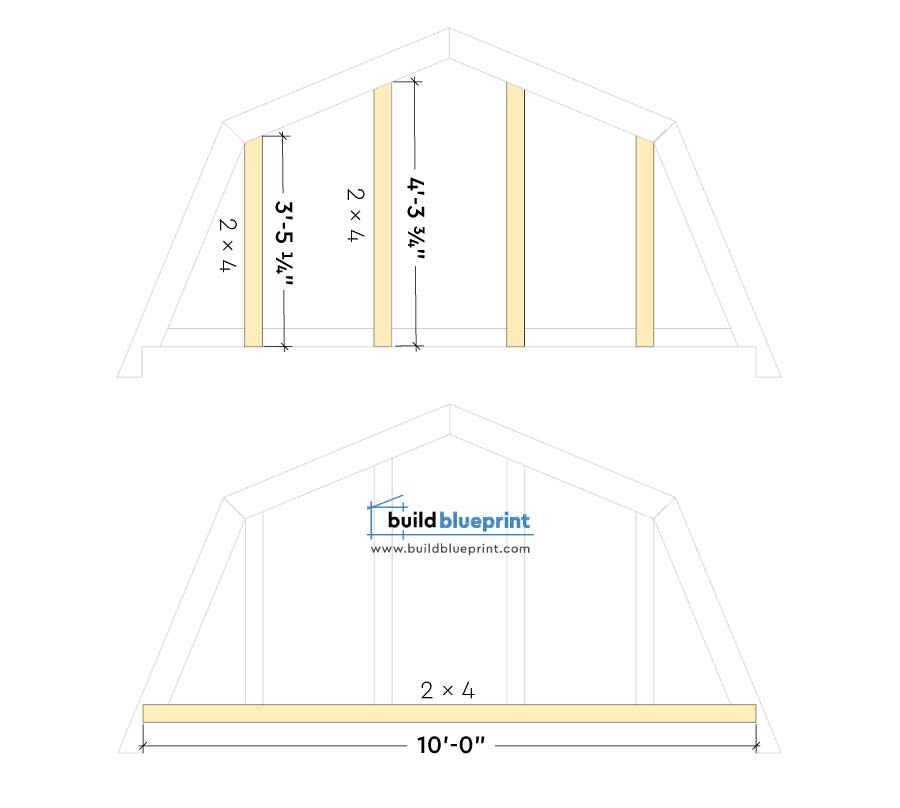
After you’ve finished assembling all the Gambrel trusses, place them 20″ O.C. on top of the wall frames. Then, use 3 1/2″ nails to secure each rafter from the underside of the plate.
Tip: you can add in 2×4 bracing members on the 2 end trusses to add more lateral structural stability.

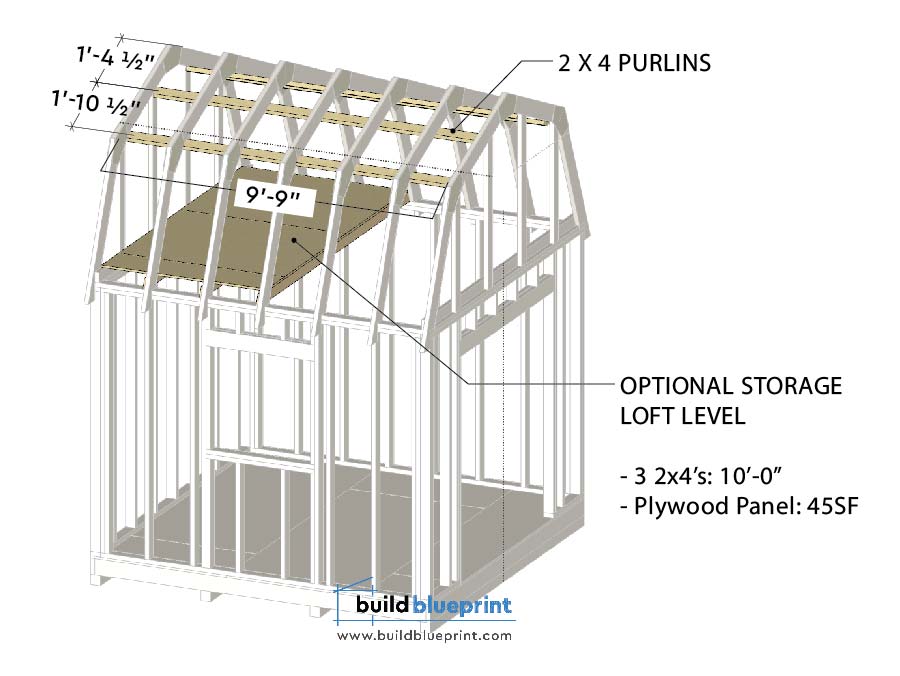
Once the truss is in place, you can start to install the purlins to add more lateral stability to the roof structure. Measure and cut out four 2×4’s to approximately 9′-9″ in length, then secure to the trusses with 3 1/2″ nails.
Tip: you can easily add a loft level for extra storage space with a few 2×4’s and 1/2″ plywood panels (45SF).
Due to the overall roof geometry, it’s easier to install the exterior siding panels first before finishing rest of the roof structure.
Firstly, measure and cut the 11 T1-11 plywood siding panels to size. Since these shed panels are designed to interlock, plan them out accordingly. The standard panel sizes are 96″ x 48″, so you’ll need about 350SF to cover the entire 10×10 barn shed.
Then, for the front wall siding, measure and cut out the door and window openings before installing. The rough double door opening is 72″ x 77″, and the optional window opening is about 2′-11 1/4″ x 2′-11 3/8″.

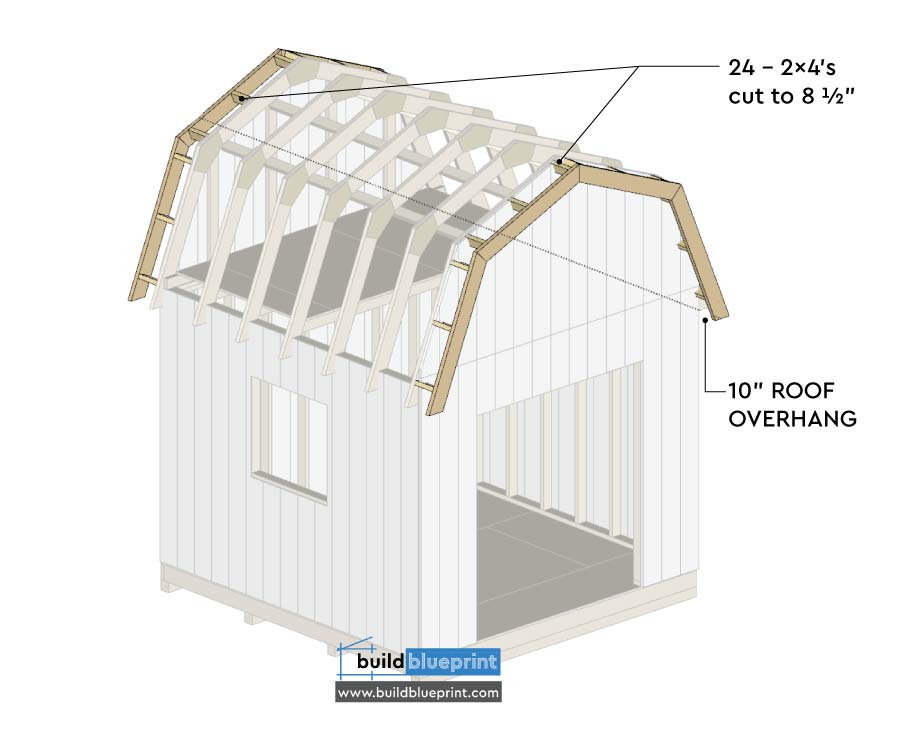
Now that the exterior siding is in place, assemble 2 more identical Gambrel trusses (without notches and gussets), and cut 24 2×4’s to 8 1/2″ in length. Install as shown in the plan below using 3 1/2″ nails. As a result, this will extend the roof and create small overhangs on both side of the shed.
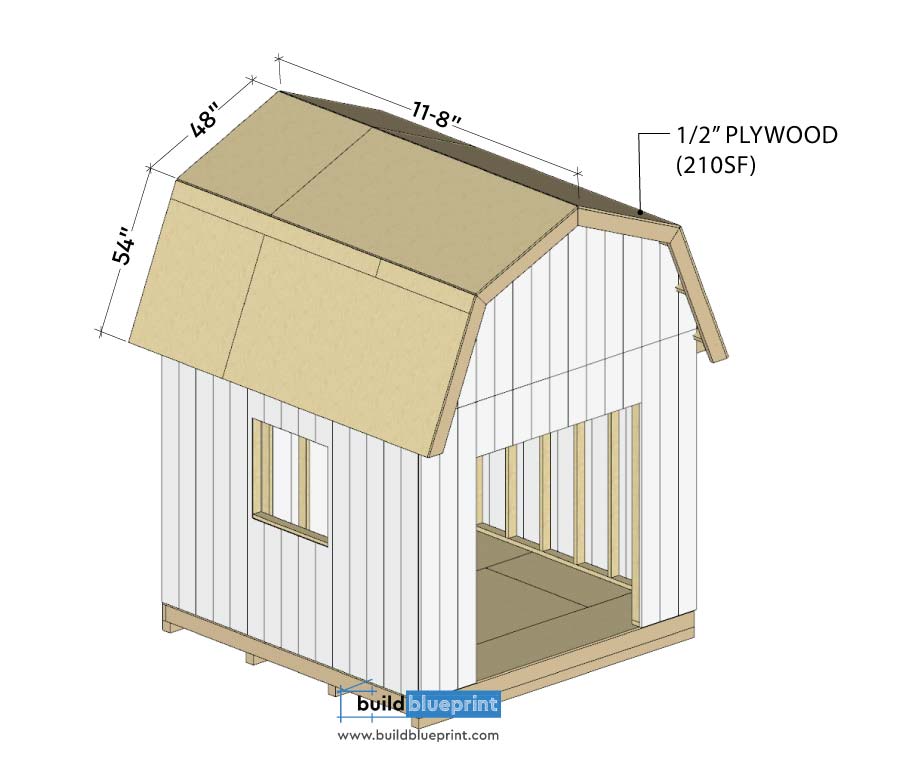
Next step is to measure and cut 1/2″ plywood sheets for the barn shed roof. Since these sheets usually come in the standard 96″ x 48″ size, you’ll need about 210SF to cover the entire roof structure. Insert 2 1/2″ nails into the Gambrel trusses at about every 10″ to lock the plywood sheets in place.
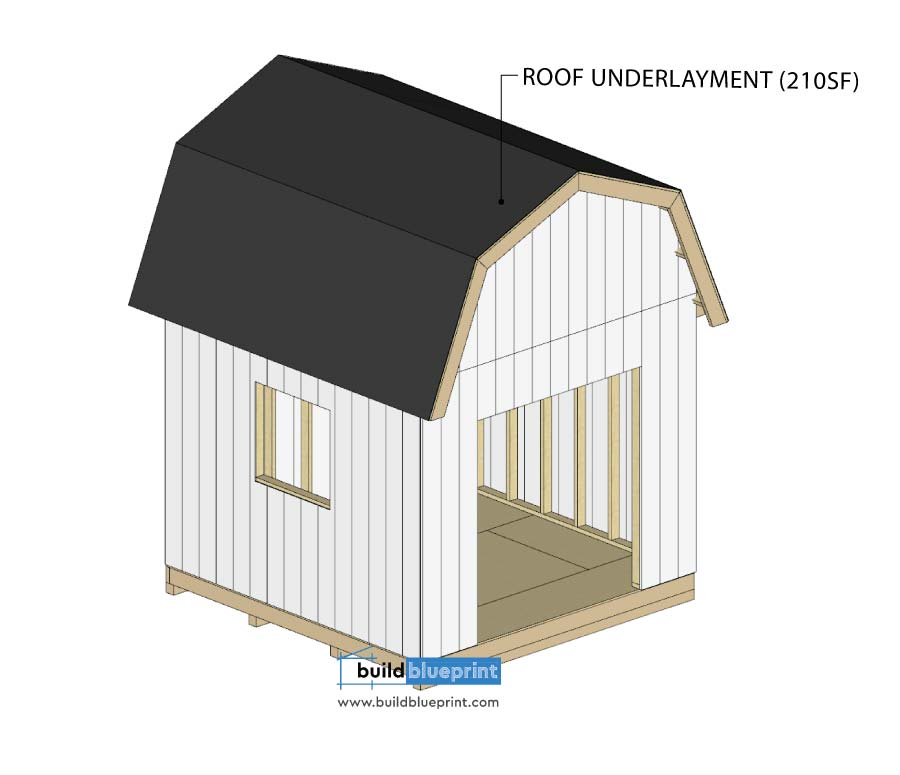
When the panels are all secured, cover the entire Gambrel roof with roof underlayment or tar paper, this is a water-resistant barrier material to keep the wood structures underneath dry. In general, a 10×10 barn shed will require about 210SF to cover the entire roof area.
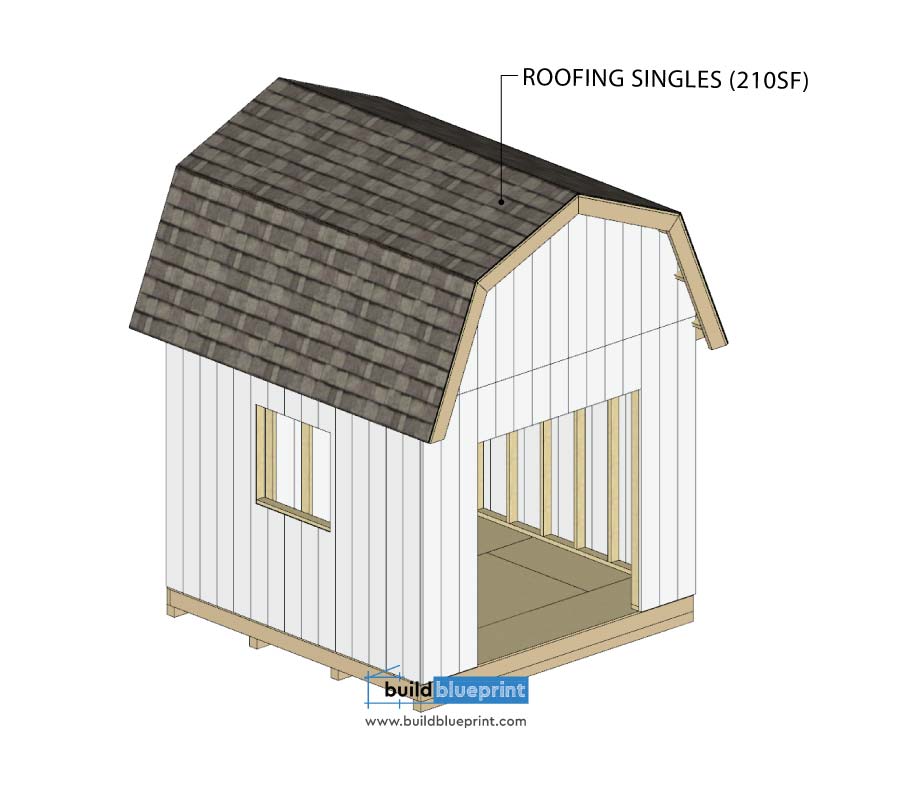
Finally, we need to lay out the roof shingles (210SF of 3-tab roof shingles) to complete the barn roof build. Start at the bottom of the Gambrel roof, measure and mark every increment height all the way to top of the roof. Then, use glue or glue strip along the rake edge and drip edge. Simultaneously, insert 2 1/2″ nails to secure in place.
Tip: You can select the roof shingle material to match the roofing material of the main house for a unified look! Get samples from your local hardware or home renovation store to get a close match.
Step 4 – Trims, Door, and Window
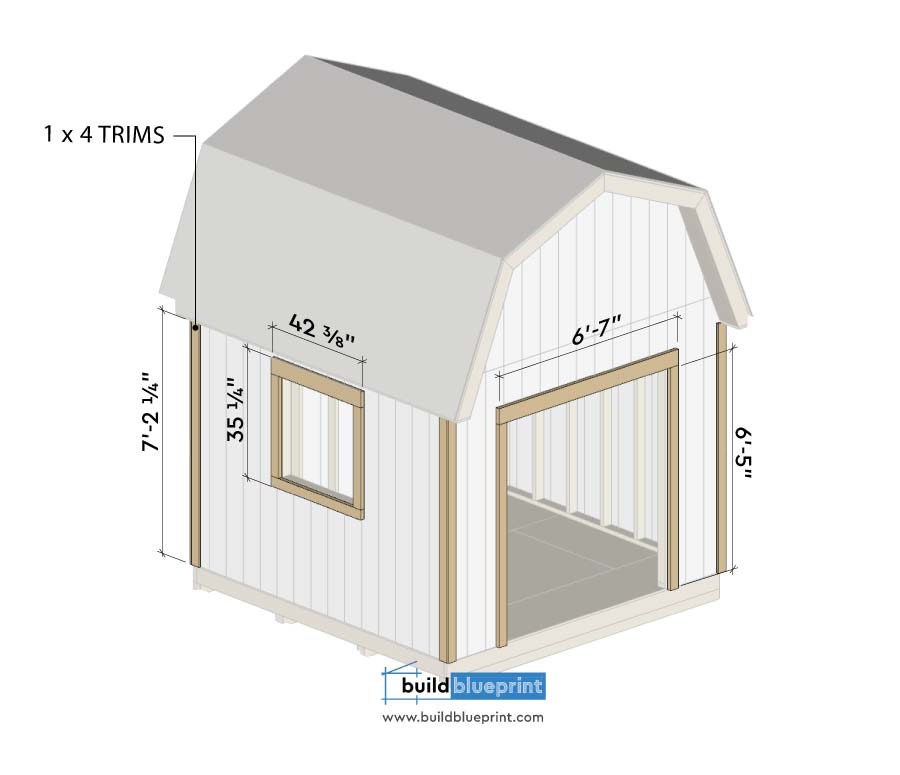
Installing wall corner trims will add more durability to the shed exterior sidings and give it a professional look. First, measure and cut eight 1 x 4 lumbers to 7′-2 1/4″, trim the top angle as needed. Then, align and secure these trims with 2 1/2″ nails into the wall frames.
As for the door trim: use a 6′-7″ long 2×6 as the header trim, and two 6′-5″ long 2×4’s as frame trims. The window will require a 42 3/8″ 2×6 header, and 35 1/4″ side trims. Secure all trims to the studs with 2 1/2″ nails.
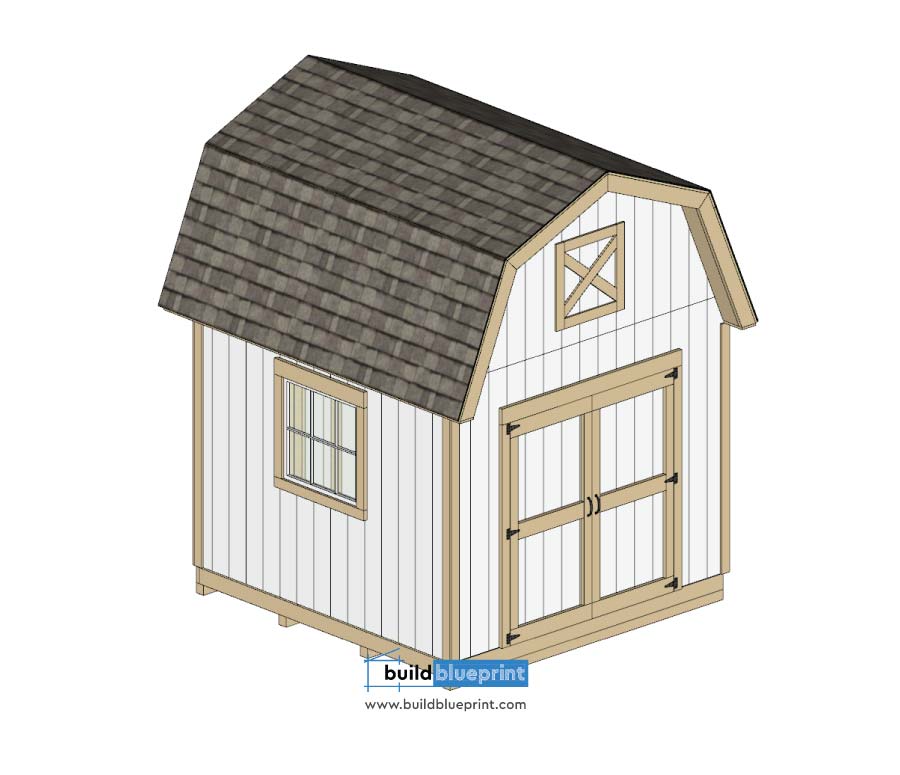
Add in the barn shed doors and optional window. Refer to the detailed Doors and Window plans compatible with this 10×10 barn shed plans below:
Double Door Plan
Window Plan
Step 5 – Paint
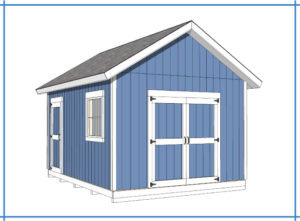
Traditionally, most barn sheds are painted red/brown to hide rust from aging. Depending on your climate, a lighter color such as white or gray will help to reflect heat and keep the inside of your barn shed cool. You can also try to match your house’s exterior color, this will give it a coherent look.
Prior to painting your 10×10 barn shed, wipe off any dirt or dusts off the T1-11 siding surface and the trims. Afterwards, prime the siding with a heavy acrylic primer, a single thorough coat will do the job. It’s best to use a small brush to fill in the grooves and corners first, and then use a larger roller to cover up the flat areas. Let it sit and dry. Lastly, apply two coats of exterior grade acrylic paint, allow 2 hours between coats to completely dry.
If you still want to add more flairs to your shed, check out these cool decorative ideas.
10×10 Barn Shed Plans Build Summary
To sum up, barn style sheds are one of the most recognized and timeless shed designs, and can add a lot of value to your property. In addition, the Gambrel style truss has a natural high sloping roofline, which increases the overall height and volume of the storage space. This set of 10×10 barn shed plans can be customized to create a number of barn shed variations, get your tools and get creative!