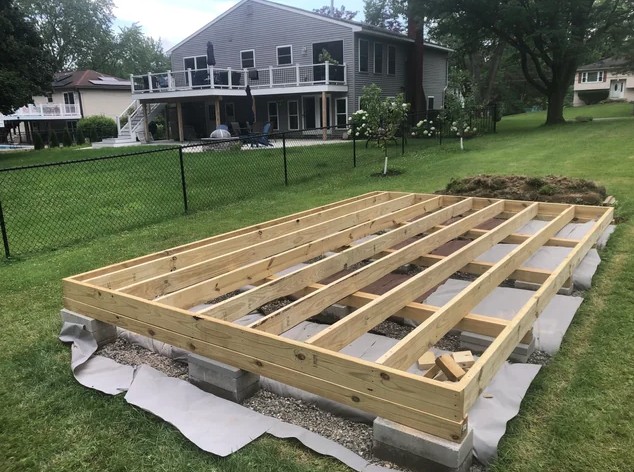
Concrete deck blocks are the right foundation choice when a flat gravel pad isn’t quite enough — moderately sloped sites, larger sheds that need better load distribution, or ground that isn’t level enough for skids to sit flat without a lot of extra grading. They cost more than a gravel pad and take a bit more precision to install, but they handle uneven terrain far better and provide a more stable base for bigger structures. Use our free shed foundation calculator to estimate your shed foundation layout, material quantities, gravel, concrete, piers, deck blocks, and skid foundation materials.
This guide covers the complete installation process: how to lay out block positions correctly, how to handle grade changes across the site, how to level every block into a single flat plane, and how to set your beams on top. If you haven’t decided whether deck blocks are the right foundation for your project, see our shed foundation comparison guide for a full breakdown of when to choose blocks over a gravel pad, piers, or a poured slab.
What You’ll Need
Materials
- Concrete deck blocks: Precast blocks with a notched or slotted top for a 4×4 or 4×6 beam. Quantity depends on shed size — calculated below.
- 3/4″ crushed stone: A 2–3 inch bed under each block. A few hundred pounds covers most shed layouts.
- Pressure-treated 4×4 or 4×6 beams: Ground-contact rated (UC4A or UC4B), sized to match your block notches.
- Marking stakes and string line: For laying out block positions square and level.
- Shims (composite or pressure-treated wood): For fine height adjustments under individual blocks.
Tools
- Round point shovel or post hole digger
- Wheelbarrow
- Hand tamper
- 4-foot level and a long straightedge or level board
- Line level (clips onto a string line)
- Tape measure
- Mason’s line or string
How many blocks do you need?
Block count depends on shed size, beam span, and your plan’s specific layout — always check your plan’s foundation diagram first. As a general guideline, blocks are placed at every corner and at 4-foot intervals along the perimeter beams, with additional interior blocks under any center beam for spans over 8 feet.
| Shed Size | Typical Block Count | Beam Length Needed |
|---|---|---|
| 8×10 | 6 blocks | Two 10-ft beams, one 8-ft center beam |
| 10×12 | 8 blocks | Two 12-ft beams, one 10-ft center beam |
| 12×16 | 9–12 blocks | Two 16-ft beams (spliced), one to two center beams |
| 16×20 | 12–16 blocks | Multiple spliced beams; verify against your plan |
Concrete deck blocks run $6–$12 each at Home Depot or Lowe’s. For a 10×12 shed needing 8 blocks, budget $50–$100 for blocks alone, plus $80–$150 for pressure-treated beams and $30–$50 for gravel — a total of roughly $200–$300 for the full foundation. For a complete cost comparison against gravel pads, piers, and slabs, see our shed cost guide.
Step 1: Assess Your Site
Concrete deck blocks are the right choice when your site has moderate slope — roughly 6 to 12 inches of grade change across the shed footprint. If your site is essentially flat, a gravel pad with skids is simpler and cheaper. If your site has more than 12 inches of grade change, or your soil is soft and expansive, concrete piers extending below the frost line will give you a more stable long-term result. See our foundation comparison guide if you’re still deciding between these options.
Measure the actual grade change before you commit. Drive a stake at the high corner of your intended shed location and another at the low corner. Stretch a string line between them, level the string using a line level, and measure the vertical distance from the string down to the ground at the low stake. This distance is your total grade change across the site.
Also confirm setback compliance before doing any layout work — most counties require 5–10 feet from the rear property line and 3–5 feet from side property lines, measured from the actual property boundary rather than your fence line. See our permit guide for how to verify your specific setback requirements.
Step 2: Lay Out Block Positions
Accurate layout is more important with deck blocks than with a gravel pad, because each block is an individual point of support — if the layout is off, the beams won’t sit correctly in the block notches.
- Mark the four corners of your shed footprint using stakes, confirming square corners with the 3-4-5 method: measure 3 feet along one side and 4 feet along the adjacent side from a corner stake; if the diagonal between those two points measures exactly 5 feet, the corner is square.
- Run string lines between all four corner stakes to define the full perimeter.
- Mark block positions along the string lines according to your plan’s foundation diagram — typically at each corner and at 4-foot intervals along the perimeter, with interior blocks at the midpoint of any beam spanning more than 8 feet.
- Check both diagonals of the full rectangle to confirm the entire layout is square before you start digging. For a 10×12 layout, the diagonal should measure approximately 15 feet 7.5 inches (calculated using the Pythagorean theorem: diagonal = √(length² + width²)).
Step 3: Prepare Each Block Location
At each marked block position, excavate a shallow hole roughly 12–14 inches square and 4–5 inches deep. Removing the sod and a few inches of topsoil gets you down to firmer subsoil, which provides better long-term support than setting a block directly on grass or loose topsoil.
Tamp the bottom of each excavated hole firmly with a hand tamper. Add a 2–3 inch layer of compacted crushed stone to each hole. The gravel bed does two things: it improves drainage away from the block, and it gives you a small amount of adjustability — you can add or remove gravel to fine-tune each block’s height before final leveling.
Step 4: Set and Level Each Block
This is the step where deck block installation earns its reputation for being fussier than a gravel pad — but it’s also what makes deck blocks work well on uneven ground.
Establish your reference height first. Before setting any blocks, stretch a level string line across the entire layout at the height you want your beam tops to sit. Use a line level to confirm the string is level, and adjust the string height at each stake until it’s consistent across the whole layout. This string line becomes your reference for every block — instead of leveling each block relative to the ground beneath it (which varies), you’re leveling every block relative to the same fixed reference line.
Set the low-side blocks first. Starting with the blocks on the lowest part of your slope, place each block on its gravel bed and adjust the gravel depth until the block’s top notch is at the exact height of your reference string. Use a 4-foot level to check the block is level in both directions — front-to-back and side-to-side — not just at the correct height.
Work toward the high side. As you move toward higher ground, you’ll excavate deeper at each subsequent block position to keep the block top at the same reference height. This is the entire point of using individual blocks on sloped ground — each one can sit at a different depth in the soil while still bringing all the block tops into the same flat plane.
Use shims for fine adjustment. Once a block is close to correct height, thin composite or pressure-treated wood shims placed under the block can fine-tune the last half-inch or so without having to re-dig and re-tamp the gravel bed. Avoid stacking more than one or two shims per block — if you need more than that, add or remove gravel instead for a more stable long-term result.
Check every block against the string line as you go, not just once at the end. It’s much easier to adjust one block at a time than to discover at the end that three blocks in the middle of the layout are slightly off and need to be redone.
Step 5: Verify the Full Layout Is Level and Square
Once all blocks are set, do a final check before moving on to beams.
Check level across the entire layout. Remove the reference string line and instead lay a long, straight board across multiple blocks at a time, checking with a 4-foot level placed on top of the board. Work across the full layout in both directions — lengthwise and widthwise — to confirm every block top is in the same flat plane. Any block that’s off should be adjusted now, before beams are set.
Recheck the diagonals. Measure both diagonal distances across the full block layout one more time to confirm everything is still square after the excavation and leveling process. Soil can shift slightly during digging, so this final check catches any small drift.
Step 6: Set the Beams
Cut your pressure-treated 4×4 or 4×6 beams to length according to your plan. Lower each beam into the notches of its corresponding row of blocks. The notch in a standard deck block is sized to hold the beam securely without additional hardware, though some builders add a metal post base connector or screw the beam to the block through a pre-drilled hole for extra security in high-wind areas.
Once beams are set, do one more level check across the tops of the beams themselves — not just the blocks — since a slightly warped or twisted beam can introduce a small amount of error even when the blocks beneath it are perfectly level. Address any high or low spots now, before floor joists go on.
Common Mistakes to Avoid
Leveling each block to the ground instead of a shared reference line. On sloped ground, leveling each block independently to “look level” without a shared string reference is the most common way deck block foundations end up slightly out of plane. Always establish one level reference line across the whole layout first, then bring every block to that same height.
Skipping the gravel bed under each block. Setting blocks directly on soil without a compacted gravel base beneath them is a common shortcut that causes problems within a year or two — the blocks settle unevenly as the soil beneath them compresses at different rates. The gravel bed takes a few extra minutes per block and prevents this.
Stacking too many shims. A shim or two per block for fine adjustment is normal. Four or five stacked shims under one block is a sign that block wasn’t excavated to the right depth in the first place — dig deeper or add gravel instead of relying on a tall stack of shims, which can shift or compress under load over time.
Using blocks on unstable or expansive soil. Concrete deck blocks work well on firm, well-draining soil. On soft, wet, or expansive clay soil that swells and shrinks significantly with moisture changes, individual blocks can shift independently of each other over time, throwing the floor frame out of level. If you know your soil is expansive clay, concrete piers extending below grade to more stable soil are a better long-term choice — see our foundation options guide for that comparison.
Not accounting for the beam thickness when setting your reference height. The reference string line should represent the top of the finished beam, not the top of the block itself. Measure down from your desired final floor height by the beam thickness (typically 3.5 inches for a 4×4) when setting your block-top reference line.
Placing blocks too far apart. Beam spans between blocks that are too long will cause the beam to sag under the floor load over time. Follow your plan’s specified block spacing rather than spacing them further apart to save money on blocks — a sagging beam is a much more expensive problem to fix later than a few extra deck blocks would have cost upfront.
Concrete Deck Blocks vs. Poured Piers: When to Upgrade
Deck blocks sit on the surface of compacted gravel and are not anchored below the frost line, which means they can be affected by significant freeze-thaw heaving in cold climates. If you’re building in a region with deep frost penetration (18 inches or more) and you’re seeing signs of seasonal ground movement on your property — cracked walkways, heaving fence posts — poured concrete piers extending below the frost line are a more reliable long-term foundation than surface-set deck blocks.
Deck blocks are also not the best choice on steeply sloped sites. Once the grade change across your shed footprint exceeds about 12 inches, the amount of excavation needed at the low end to bring blocks up to a shared reference height becomes impractical, and poured piers set at varying heights handle the transition more efficiently.
For most residential shed builds on moderately sloped, stable, well-draining sites, deck blocks provide a good balance of cost, installation simplicity, and performance. See our full foundation comparison guide for a detailed breakdown of when each foundation type makes the most sense.
Frequently Asked Questions
How many concrete deck blocks do I need for a shed?
Block count depends on shed size and beam span, but as a general guideline, blocks are placed at every corner and at roughly 4-foot intervals along perimeter beams, with additional interior blocks under any beam spanning more than 8 feet. An 8×10 shed typically needs 6 blocks; a 10×12 needs about 8; a 12×16 needs 9–12. Always check your specific plan’s foundation diagram, since spacing requirements vary based on joist size and floor load.
Do concrete deck blocks need gravel underneath them?
Yes. Each block should sit on a 2–3 inch bed of compacted crushed stone, not directly on soil. The gravel bed improves drainage away from the block, provides a stable base that resists settling, and gives you a small amount of adjustability when leveling each block to a shared reference height.
Can concrete deck blocks be used on a slope?
Yes — this is one of their main advantages over a flat gravel pad. Deck blocks can be set at different depths across a sloped site, with more excavation at the high end and less at the low end, to bring all the block tops into the same level plane. This works well for moderate slopes up to about 12 inches of grade change across the shed footprint. Beyond that, concrete piers are usually a better solution.
Are concrete deck blocks permanent?
No. Concrete deck blocks are considered a non-permanent foundation in most jurisdictions, similar to a gravel pad with skids. They sit on the surface rather than being set in poured concrete or extending below the frost line, which means the shed can theoretically be relocated, and the foundation is more likely to qualify for permit exemptions than a poured concrete slab. Check with your local building department to confirm how your jurisdiction classifies deck block foundations specifically.
How deep should concrete deck blocks be buried?
Deck blocks are typically set with the bottom resting on a 2–3 inch gravel bed at a shallow depth — usually just enough excavation to remove sod and topsoil, roughly 4–5 inches total. They are not buried to any significant depth and do not extend below the frost line, which distinguishes them from concrete piers. This shallow installation is part of what makes them faster and less labor-intensive than a pier foundation.
What size beam do I need for concrete deck blocks?
Most concrete deck blocks are notched to accept a 4×4 beam, though some models accept 4×6 or even 6×6 beams for larger structures. Check the notch size on the specific blocks you’re buying before purchasing your beam lumber, and always use pressure-treated lumber rated for ground contact (UC4A or UC4B) since the beam will be exposed to moisture and ground-level humidity.
Ready to Start Building?
Once your blocks are set, leveled, and your beams are in place, the next step is building your floor frame — and every plan on this site picks up from there with complete floor framing, wall framing, and roof framing plans through to the finished shed.