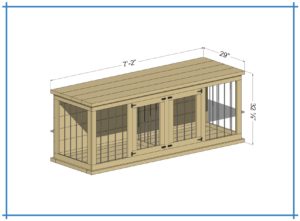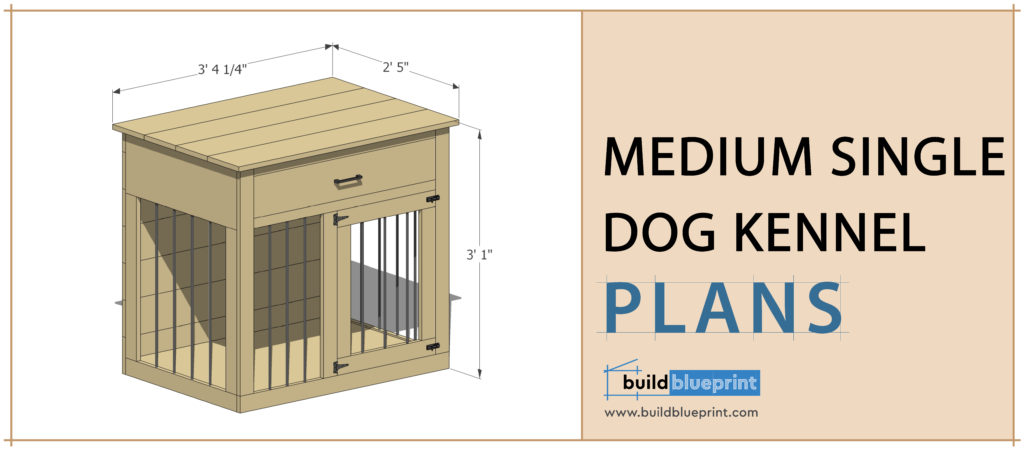
Single Medium Dog Kennel w/ Drawers Plans & Instructions
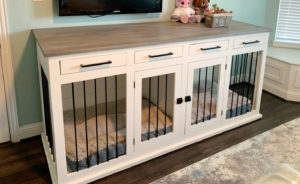
Designed to comfortably house one medium sized dog (30- 50lbs), or multiple smaller puppies. Top is wide enough to hold a large TV and decors. This is a nice showpiece for the living room, and can be stained or painted to match rest of the furniture.
Get the complete Medium Dog Kennel DIY Plans – Instant PDF download 8.5″ x 11″
PDF includes the cut list, additional diagrams and dimensions, complete step-by-step DIY instructions.
Buy Complete PDF Plan
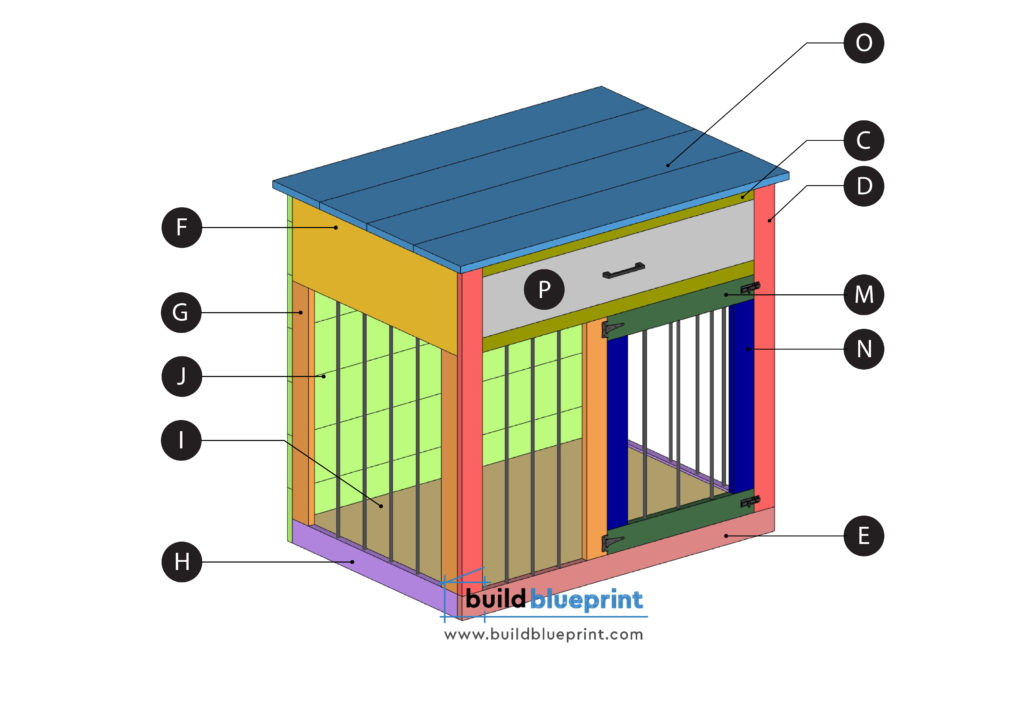
Material and Cut List
(A) 2 – 2×4 Lumber: 36 3/4″
(B) 2 – 2×4 Lumber: 18 1/2″
(B) 1 – 2×2 Lumber: 18 1/2″
(C) 2 – 1×3 Lumber: 33 1/4″
(D) 2 – 1×3 Lumber: 33 3/4″
(E) 1 – 1×3 Lumber: 38 1/4″
(F) 2 – 1×10 Lumber: 25 1/2″
(G) 4 – 1×3 Lumber: 24 1/2″
(H) 1 – 1×3 Lumber: 25 1/2″
(I) 1 – 3/4″ Plywood: 36 3/4″ x 25 1/2″
(J) 6 – 1×6 Lumber: 38 1/4″
(J) 1 – 1×4 Lumber: 38 1/4″
(K) 2 1×3 Lumber: 36 3/4″
(L) 3 1×3 Lumber: 20 1/2″
(M) 2 1×3 Lumber: 18″
(N) 2 1×2 Lumber: 19 1/2″
(O) 4 1×8 Lumber: 40 1/4″
(P) Drawer Materials: Refer to Step 7
11 – 3/8″ Diameter Rebar: 26 1/2″
3 – 3/8″ Diameter Rebar: 21 1/2″
Rust-Oleum Epoxy Metal Paint
HARDWARE
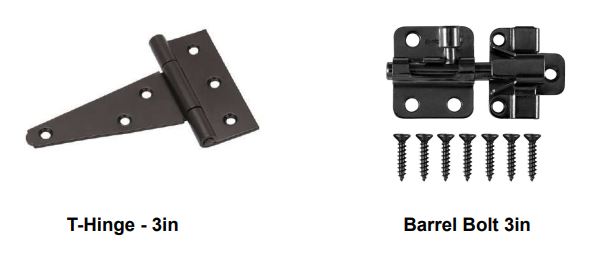
– (2) 3″ T-Hinge Hardware
– (2) 3″ Barrel Bolts
– 1 1/4″ Pocket Screws
– 2 1/2″ Pocket Screws
– 3/8″ Dowels
PROJECT TOOLS
– Tape Measure
– Pocket-hole Jig
– Cordless Drill
– Miter Saw / Circular Saw
– Screwdriver
– Sandpaper or Sand Block
– Refer to the woodworking tool guide for more information
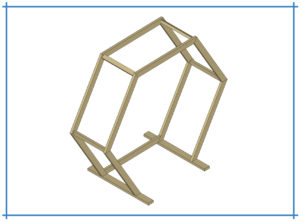
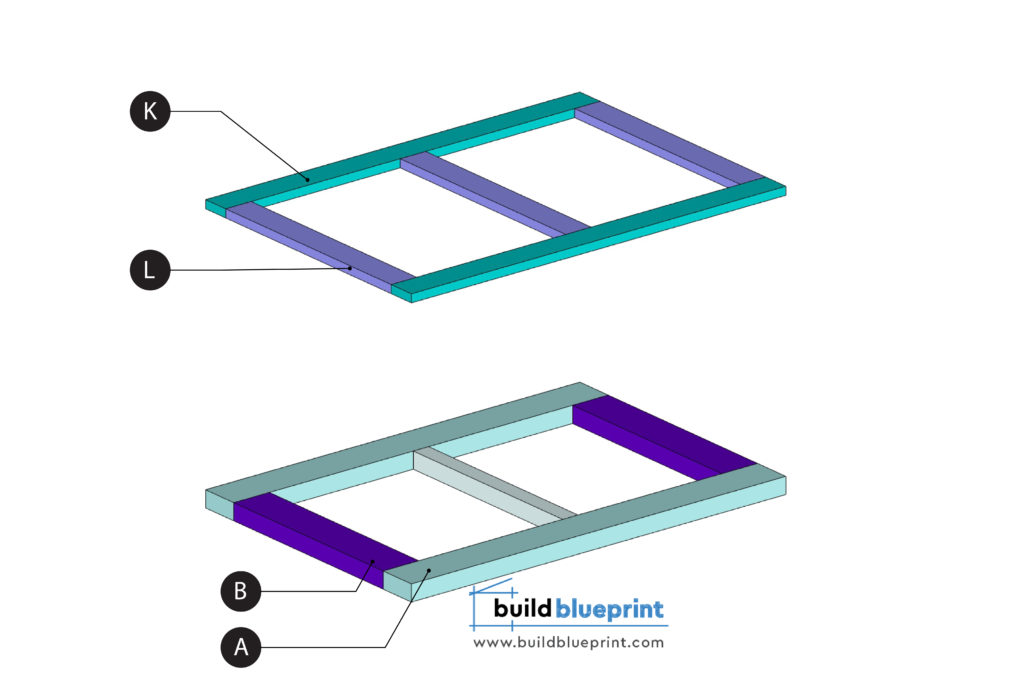
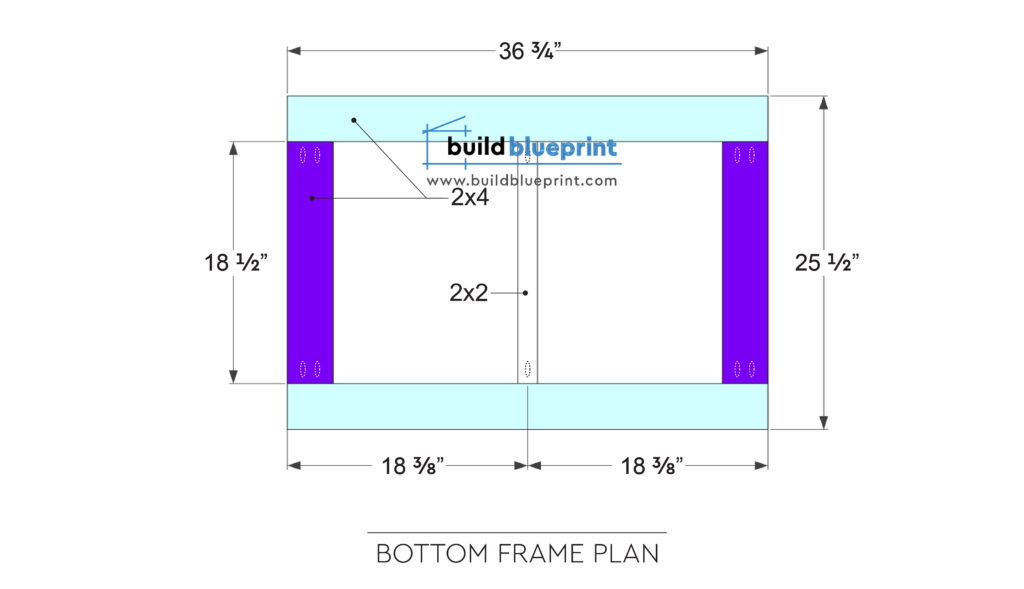
Step 1 – Kennel Base
Cut the 2×4 lumbers per cut list dimensions. The bottom frame is made from two 36 3/4″ 2×4’s and two 18 1/2” 2×4’s, with 2×2 for center bracing. Arrange the 2×4’s per layout below. You can use wood glue to assemble each lumber first. Then, drill pocket-holes and use 2 1/2” size screws to secure in place.
All vertical panels will sit directly on top of the bottom frame, with 1” offset from the perimeter edges. Finish building all the panels first before screwing them into the bottom frame, to ensure all the panels fit in place properly. Drill pocket-holes in the 1×3 panels and use 1 1/4” screws to secure to the bottom 2×4 frame.

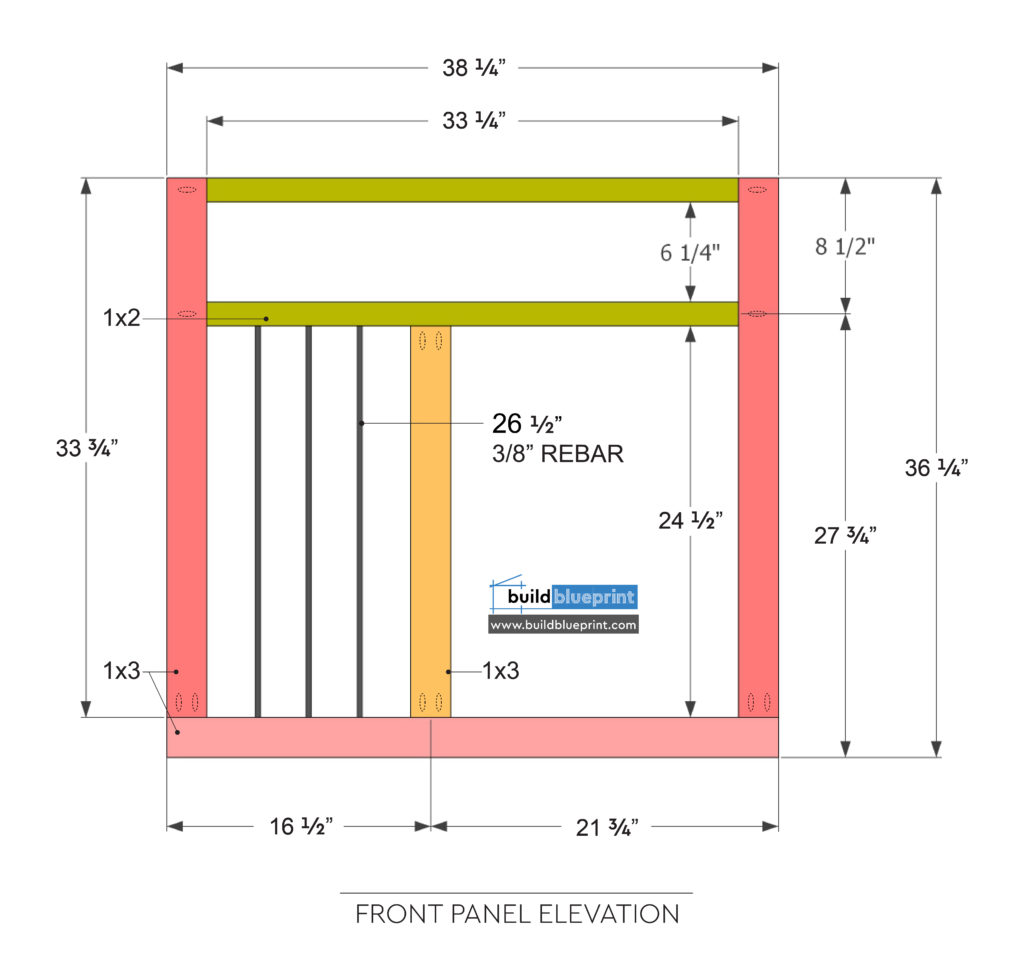
Step 2 – Front and Side Panels
Next, cut the 1×2 and 1×3 lumbers per cut list for the front facing panel. You will need two 33 3/4” 1×3’s, one 38 1/4” 1×3’s, one 24 1/2″ 1×3, two 33 1/2″ 1×2’s, and three 26 1/2” rebar. Drill dual pocket-holes on both ends of the 1×3’s. Only screw into the bottom lumber piece first. Then, drill 3/8” diameter holes (1” depth) into both the top and bottom lumber to fit the rebar.
Before installing the metal rebars in place, you will need to prepare and paint them to avoid rusting. The best type of pet-friendly paint for metal is the Rust-Oleum Specialty Epoxy Spray Paint, which is ideal for refinishing metal surfaces and provide a durable finish. Don’t worry, this process is simple! First, clean the metal rebars of any dirt or rust, then spray two coats of the epoxy paint directly onto the rebars. Allow 2-4 hours to complete dry before installing them on the kennel doors.
Insert the 3/8” rebars into the holes. Finally, add the top lumber piece and secure it in place with 1 1/4” pocket screws.
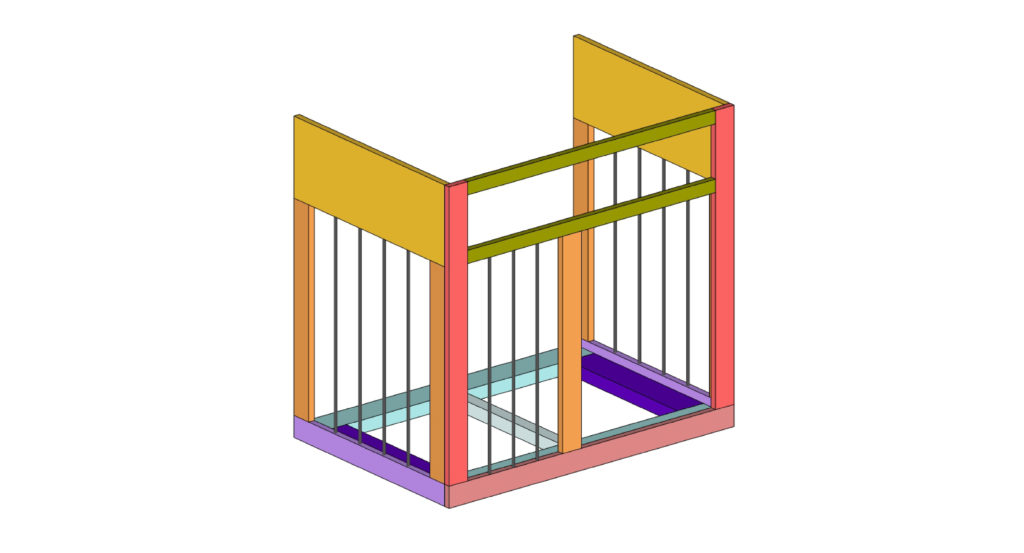
Next, cut 1×2 and 1×3 lumbers per cut list for the side panels. You will need two 33 3/4” 1×3’s, one 38 1/4” 1×3’s, one 24 1/2″ 1×3, two 33 1/2″ 1×2’s, and three 26 1/2” rebars. Total of two side panels. Drill dual pocket-holes on both ends of the 1×3’s. Only screw into the bottom lumber first until you insert the rebar in place.
![]()
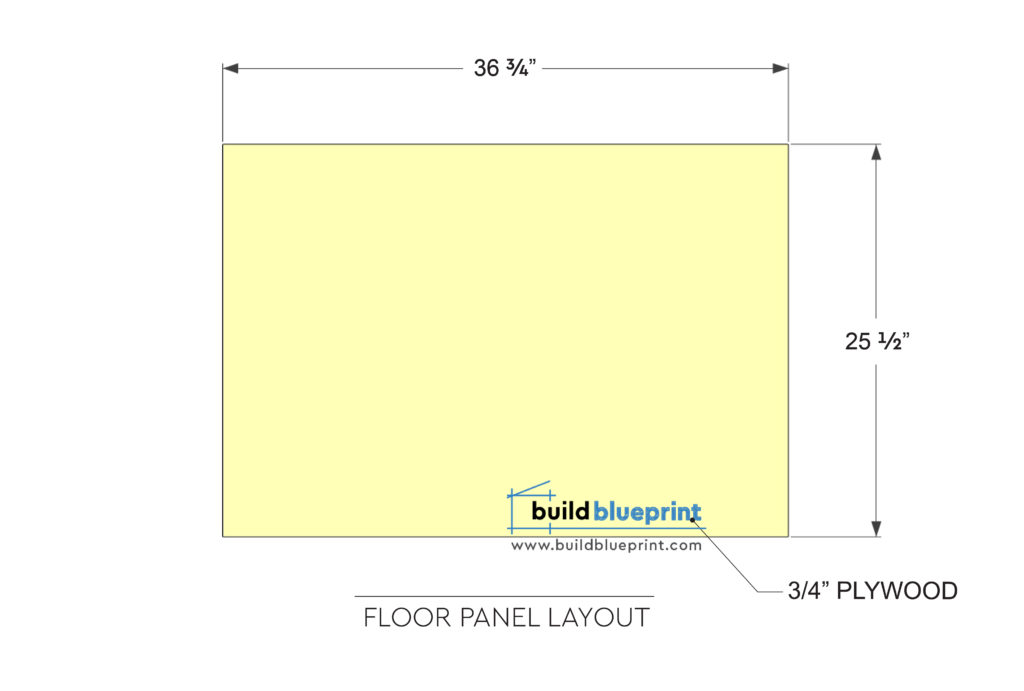
Step 2 – Flooring
The floor panel is made out of 3/4” plywood, cut to dimensions below. You can use 2” nails to secure the floor panel onto the bottom frame.
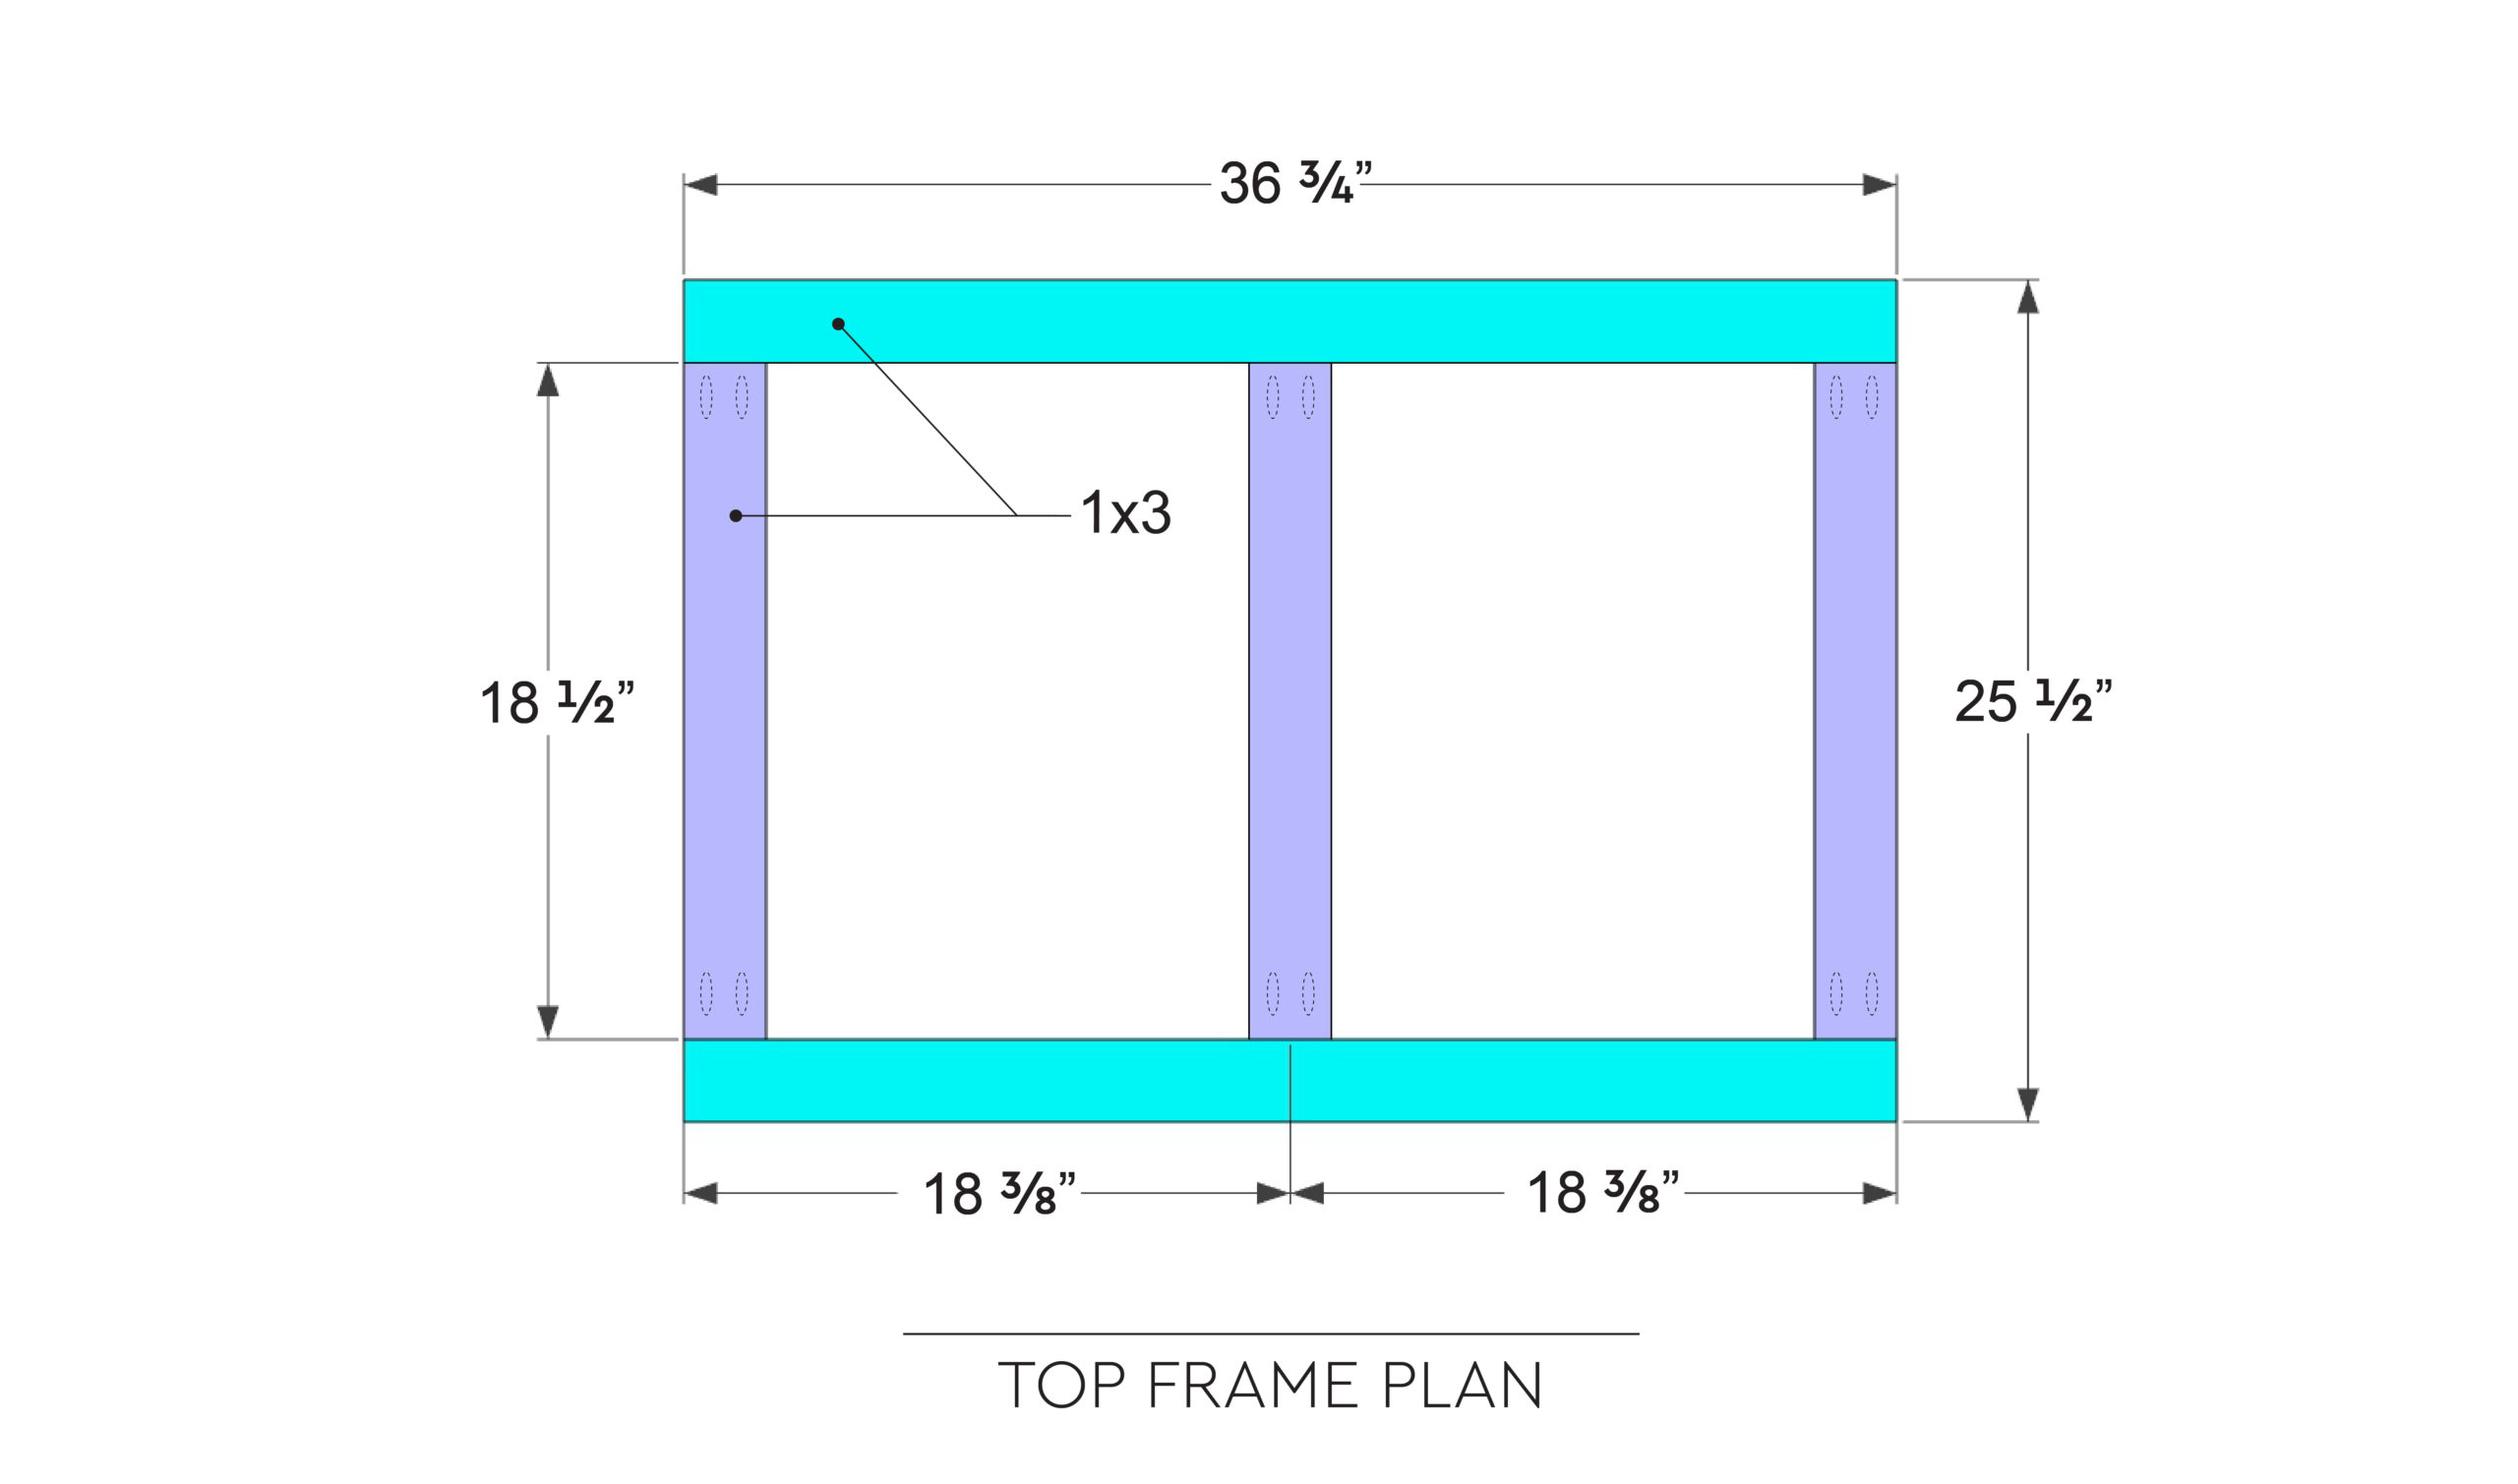
Step 4 – Top Bracing
The top support frame will add more structural integrity to the kennel. Cut 1×3’s per dimension below, drill pocked holes and secure with 1 1/4” nails. Position the frame in place, with top aligning with the drawer opening. See next page for section. You can also use 1 1/2” angle brackets to attach the support frame.
Step 5 – Back Panel
The back panel is made up of six 38 1/4” 1×6’s and a single 38 1/4” x 3 1/4” lumber. Drill pocket-holes per location indicated below, then glue and secure in place with 1 1/4” screws. You can also use other lumber sizes or 3/4” plywood sheet to build this 38 1/4” x 36 1/4” back panel.
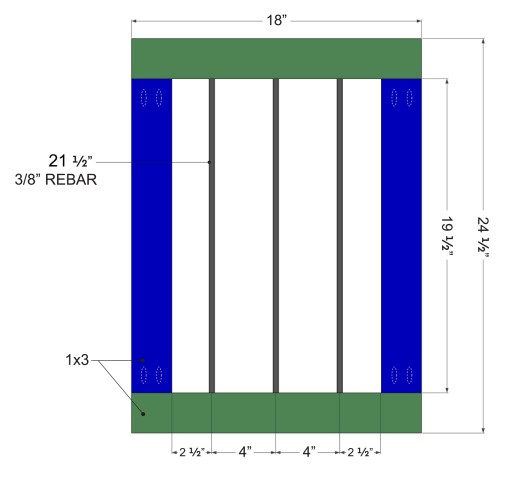
Step 6 – Kennel Doors
Next, cut 1×3 lumbers per cut list for the door panels. You will need two 18” 1×3’s, two 19 1/2” 1×3’s, and three 19 1/2” rebars, per door. Similar to the previous panels, drill dual pocket-holes on both ends of the 19 1/2” 1×3’s. Only screw into the bottom lumber first.
3″ T-Hinge Hardware: https://amzn.to/3KjrpsJ
3″ Barrel Bolts: https://amzn.to/3TcPpBR
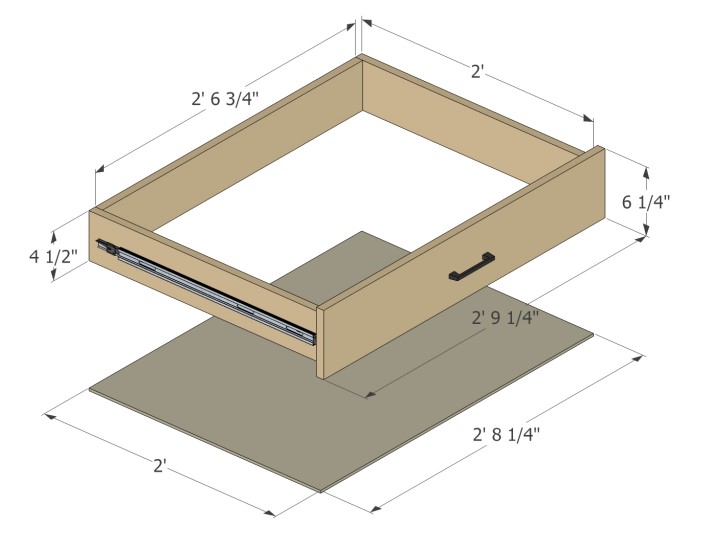
Step 7 – Kennel Drawers
Almost there! We will use 1×6’s, 1×8’s, and 1/4” plywood to build out the drawer. Leave 1/2” gap between the drawer box for drawer slides. Cut the drawer panels and use 1 1/4” pocket screws to secure together, attached 1/4” plywood to the bottom with nails.
Finally, cut four 40 1/4” 1×8’s for the table top piece. Drill pocket-holes as indicated in the layout below, then use 1 1/4” screws to secure in place. Pocket-hole side will face the bottom side. You can also construct the table top using other lumber sizes or plywood, as long as the overall dimensions are the same.
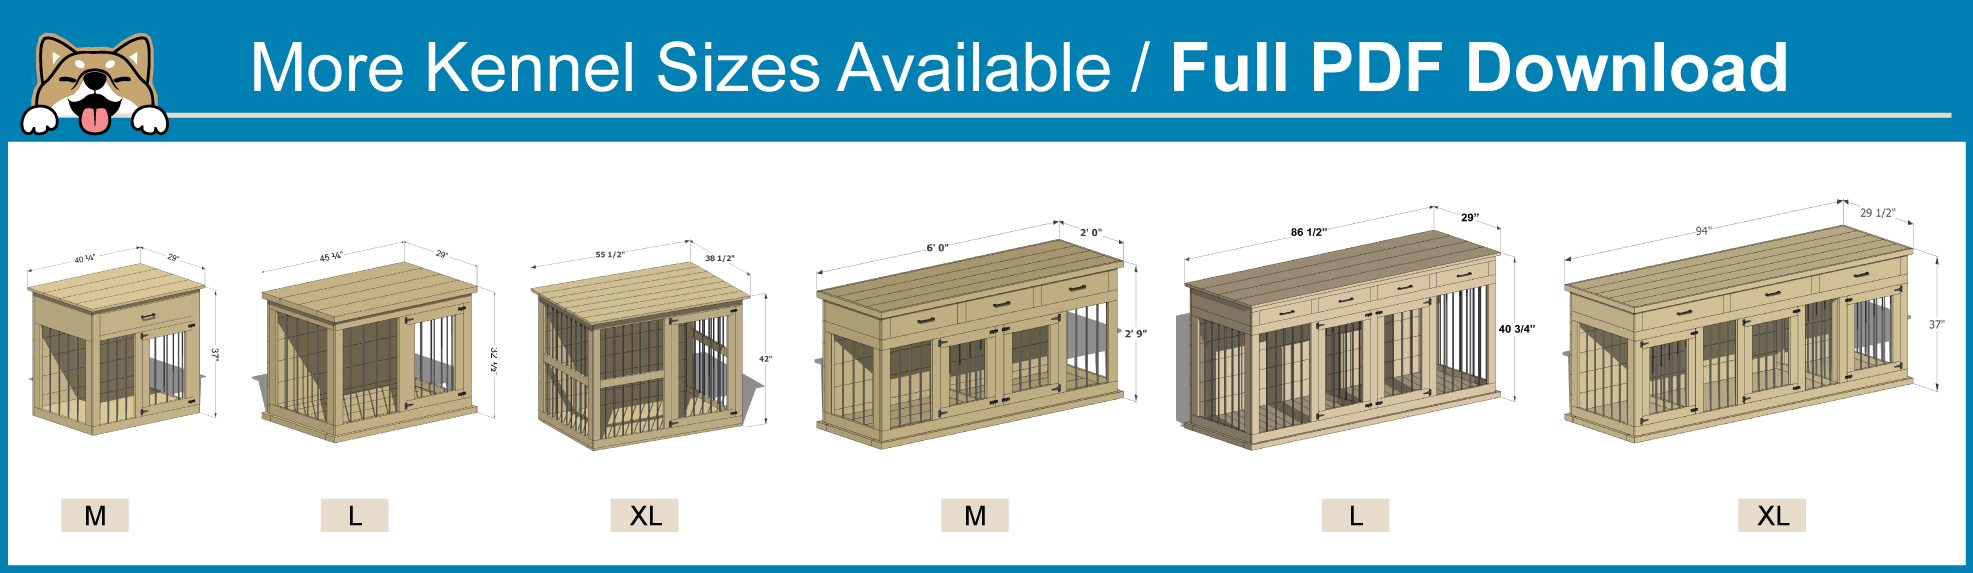
Need another kennel size? Check out my shop for more kennel design and sizes. The full PDF plans include the full materials list, cut list, complete dimensions, 2D/3D diagrams, step-by-step instructions, and helpful tips. Thank you for your support!