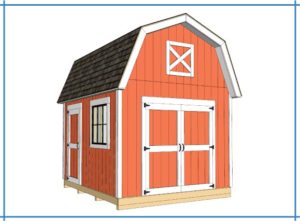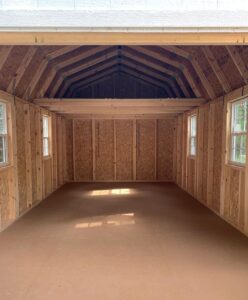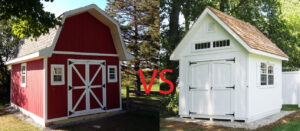
 The gambrel roof is the classic barn shape — two roof slopes on each side, a steeper lower slope and a shallower upper slope, meeting at a break point partway up. It’s the most recognizable roof style in American farm architecture, and it’s popular on DIY sheds for a very practical reason: it creates significantly more usable interior headroom and loft storage space than a gable roof of the same wall height, on the exact same footprint.
Gambrel framing is more involved than a gable or lean-to roof because it typically uses site-built trusses rather than simple rafters running to a ridge board, and because there are two roof angles to manage instead of one. This guide breaks the process into manageable steps: understanding truss geometry, building and assembling trusses on the ground, raising them into position, and sheathing the two roof planes.
Before you start roof framing, your walls should be complete, plumb, and square. If you haven’t finished that stage, see our wall framing guide first. If you’re deciding between a gambrel and a standard gable roof for your build, see our gable roof framing guide for a comparison of the two.
What You’ll Need
Materials
- 2×4 or 2×6 lumber: For truss members — top chords, bottom chord, and internal bracing. Size per your plan’s specification.
- 1/2″ plywood gusset plates: Cut to connect truss members at each joint, providing structural connection strength.
- Construction adhesive: Applied between gusset plates and truss members for additional holding strength alongside nails or screws.
- 16d nails or 3″ construction screws
- Temporary bracing lumber: For holding trusses upright and properly spaced during raising.
Tools
- Circular saw
- Speed square and framing square
- Tape measure
- 4-foot level and a longer straightedge
- Chalk line
- A large, flat work surface (your shed’s floor deck works well for this)
- Ladder or scaffolding for the raising step
Understanding Gambrel Truss Geometry
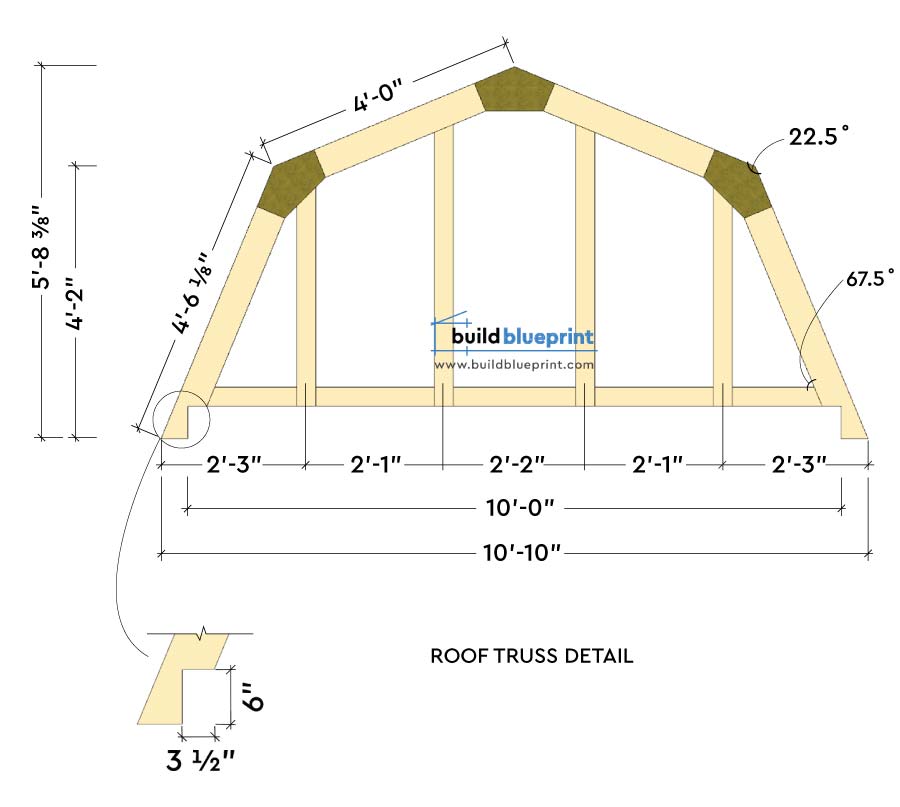
A gambrel roof truss is built from several angled members connected at specific points, rather than the simple rafter-to-ridge connection used in a gable roof. Understanding the parts makes the whole process much less intimidating.
- Lower chord (steep slope): The section of the truss running from the top of the wall up to the break point, at a steep angle — commonly in the range of 60 to 70 degrees from horizontal.
- Upper chord (shallow slope): The section running from the break point up to the ridge, at a much shallower angle — commonly in the range of 20 to 30 degrees from horizontal.
- Break point: Where the steep lower chord meets the shallow upper chord on each side of the truss. This is the defining visual feature of a gambrel roof.
- Bottom chord: The horizontal member spanning the full width of the truss at the top of the wall, tying the two lower chord bottoms together and typically forming the ceiling joist or loft floor framing.
- Gusset plate: A plywood plate nailed or screwed across each joint where truss members meet, transferring load between the connected pieces and providing the bulk of the truss’s structural strength at each connection point.
- Ridge point: Where the two upper chords from each side meet at the peak of the roof.
Unlike a gable roof, where each rafter is an independent piece installed one at a time against a ridge board, a gambrel truss is fully assembled as a single rigid unit on the ground, then raised into position as one piece. This is what makes gambrel framing both more involved to build and, in some ways, easier to install accurately — all the angle cuts and connections happen in one controlled assembly process rather than piece by piece, twenty feet in the air.
Step 1: Determine Your Truss Dimensions
Your specific shed plan will specify the exact dimensions for each truss member — the length and angle of the lower chord, the length and angle of the upper chord, the location of the break point, and the bottom chord length matching your building’s width. These dimensions are engineered specifically for your shed’s width and desired interior loft height, so follow your plan’s numbers directly rather than estimating them independently.
As a general reference, common gambrel roof proportions place the break point roughly 40–50% of the way up the total roof height, with the lower chord angle in the 60–70 degree range and the upper chord angle in the 20–30 degree range. The exact combination affects both the interior loft headroom and the roof’s overall visual proportions — steeper lower chords and shallower upper chords create more usable loft space but a taller overall structure.
Step 2: Build a Truss Template
As with rafters on a gable roof, build and test one complete truss before cutting and assembling the full set.
- Lay out the truss shape directly on your floor deck or a large flat work surface, using chalk lines to mark the exact position of each member according to your plan’s dimensions. Building directly on top of the actual layout lines, rather than working from measurements alone, makes it much easier to catch angle or length errors before you start cutting.
- Cut the bottom chord to the full width of your building at the wall top plate level.
- Cut the lower chord members (one for each side) at the steep angle specified in your plan, running from the bottom chord ends up to the break point.
- Cut the upper chord members (one for each side) at the shallow angle specified in your plan, running from the break point up to the ridge.
- Position all members according to your chalk line layout, checking that each angle and length matches your plan before fastening anything.
- Cut plywood gusset plates for each joint — where the lower chord meets the bottom chord, where the lower chord meets the upper chord at the break point, and where the two upper chords meet at the ridge. Gusset plate size and shape should follow your plan’s specification, since they’re engineered to adequately transfer load at each specific connection.
- Attach gusset plates at every joint, nailing or screwing through the plate into each connected member, working from both faces of the truss for maximum strength (this means flipping the truss over partway through to gusset both sides).
- Check the completed template truss for accuracy against your plan’s overall dimensions — height at the ridge, height at the break point, and total width — before using it as a pattern for the remaining trusses.
Step 3: Build the Remaining Trusses
Once your template truss checks out, use it as a pattern to speed up building the rest.
- Trace the template truss’s member positions onto your work surface for each subsequent truss, or keep the original chalk line layout in place and simply reuse it, removing and replacing the completed template truss with new lumber for each build.
- Cut all remaining truss members in batches — all lower chords at once, all upper chords at once, all bottom chords at once — using the template pieces as a direct pattern for consistent length and angle cuts.
- Assemble and gusset each truss using the same process as the template, working through your full truss count one at a time.
- Stack completed trusses flat and protected until you’re ready to raise them, to avoid warping or damage before installation.
The number of trusses you need depends on your building’s length and your plan’s specified truss spacing — commonly 16 or 24 inches on center, matching wall stud spacing. A 12-foot-long shed with trusses at 24 inches on center needs 7 trusses; the same length at 16 inches on center needs roughly 10. Always follow your plan’s exact truss count and spacing rather than estimating.
Step 4: Raise the Trusses
Raising a gambrel truss is a two-person job at minimum, and a third person makes the process considerably safer and more controlled, particularly for larger sheds with taller trusses.
- Position the first truss at one end of the building, lifting it from the ground deck up onto the top wall plates.
- Temporarily brace the first truss plumb and centered, using diagonal bracing lumber run from the truss down to the floor deck or wall framing, on both sides of the building.
- Set the second truss at its marked position, connecting it to the first truss with temporary spacer boards (cut to your on-center spacing) along the top chord, which keeps the trusses correctly spaced and mutually supporting while you continue.
- Continue setting trusses down the length of the building, using temporary spacers between each newly raised truss and the previous one to maintain consistent spacing.
- Once all trusses are raised and spaced, nail or screw each truss’s bottom chord securely to the top wall plate below it, following your plan’s fastening schedule.
- Install permanent bracing as specified in your plan — typically diagonal bracing across the top chords and sometimes across the bottom chords as well, which ties all the trusses together into one rigid roof structure and can often replace some of the temporary bracing used during raising.
Step 5: Install Roof Sheathing
Once all trusses are raised, spaced, and braced, install roof sheathing across both the steep lower slope and the shallow upper slope — typically ½-inch plywood or OSB, installed in the same manner as any other roof style. Because a gambrel roof has two distinct slopes on each side, you’ll be working with more individual sheathing panels and more cut pieces at the break point than a simple gable roof of the same footprint, so plan for a bit more time at this stage.
Roof sheathing, underlayment, and shingle or metal panel installation are covered in detail in our separate roofing guides, which apply the same techniques to a gambrel roof’s two-slope surface as they do to a gable roof.
Using the Loft Space Created by a Gambrel Roof
The defining advantage of a gambrel roof is the usable interior volume it creates above the bottom chord — space that a gable roof of the same wall height simply doesn’t have. Once your trusses are raised, this space is ready to be finished into usable loft storage or even a small loft workspace, depending on your shed’s overall size and purpose.
A few practical notes for making the most of this space:
- Loft flooring is typically installed directly across the bottom chords of your trusses, using plywood decking similar to your main floor. Check your plan’s specification for whether the bottom chords are sized to carry a loft floor load, since not every gambrel truss design assumes loft storage will be added.
- Access to the loft is usually via a ladder or a built-in set of steps, depending on how frequently you plan to access the space and how much floor area you’re willing to dedicate to a staircase versus storage.
- Headroom in the loft area is greatest near the ridge and decreases toward the break point on either side — plan storage layout accordingly, keeping frequently accessed items near the center where headroom is best.
- Ventilation matters more in a gambrel loft than in a standard gable attic space, since the loft is more likely to be actively used rather than simply serving as an unused attic void. Gable end vents or a small operable window can help manage temperature and moisture in the loft area.
Common Mistakes to Avoid
Cutting the full truss set before validating the template. Build, gusset, and check one complete truss against your plan’s exact dimensions before cutting lumber for the remaining trusses. A geometry error caught on the first truss costs you one truss’s worth of lumber; the same error found after building ten trusses is a much bigger setback.
Undersizing or misplacing gusset plates. Gusset plates are what actually hold a truss together structurally — the wood-to-wood joints alone aren’t sufficient. Follow your plan’s gusset size and placement exactly at every joint, and gusset both faces of the truss, not just one side.
Raising trusses without adequate temporary bracing. A single freestanding truss, even a well-built one, can tip over in wind or from an accidental bump before it’s connected to adjacent trusses and permanently braced. Brace every truss immediately after raising, before moving on to the next one.
Inconsistent truss spacing. Using temporary spacer boards cut to your exact on-center spacing, rather than eyeballing the distance between trusses, keeps your spacing consistent along the full building length — which matters for sheathing panel layout and for evenly distributing roof load across all trusses.
Skipping permanent bracing specified in the plan. Temporary raising braces are not a substitute for the permanent bracing your plan calls for. Permanent bracing ties the full truss system together into one rigid structure; without it, individual trusses can rack or shift independently over time under wind or snow load.
Assuming any gambrel truss design supports loft storage. Not every gambrel truss is engineered with a bottom chord sized to carry a loft floor load — some are designed purely for the visual roof profile without loft use in mind. Check your specific plan before assuming you can add loft flooring and storage without any modification.
Frequently Asked Questions
Why does a gambrel roof have more interior space than a gable roof?
A gambrel roof’s steep lower slope pushes the roof surface outward closer to vertical near the wall line, rather than angling inward immediately as a gable roof’s single slope does. This creates significantly more usable vertical headroom throughout the loft area, particularly near the walls, where a gable roof’s ceiling would already be too low to stand or store items effectively.
Are gambrel roof trusses harder to build than gable rafters?
Yes, generally. A gambrel truss involves more individual members (lower chord, upper chord, bottom chord) meeting at more angled joints (the break point specifically) compared to a gable rafter’s single angle and simple ridge connection. However, because gambrel trusses are fully assembled on the ground before raising, the cutting and assembly work happens in a controlled setting rather than piece by piece at height, which offsets some of the added complexity.
How many gambrel trusses do I need for my shed?
Truss count depends on your building’s length and your plan’s specified spacing — typically 16 or 24 inches on center. Divide your building’s length by the on-center spacing to estimate truss count, then always verify against your specific plan, which accounts for exact spacing requirements at both ends of the building.
Can I add a loft to any gambrel shed?
Only if the trusses are engineered for it. Some gambrel truss designs use a bottom chord sized specifically to carry a loft floor load, while others are designed purely for the roof profile without loft use in mind. Check your specific plan’s truss specification before assuming loft storage capacity — adding a loft floor to a truss that wasn’t designed to carry that load can overstress the bottom chord over time.
What angle is a gambrel roof?
Gambrel roofs use two different angles — a steep lower chord angle, commonly in the 60 to 70 degree range from horizontal, and a shallower upper chord angle, commonly in the 20 to 30 degree range. The exact angles vary by design and affect both the interior loft headroom and the roof’s overall proportions. Your specific plan will provide the exact angles engineered for your shed’s width and desired loft space.
Is a gambrel roof more expensive to build than a gable roof?
Generally yes, due to the additional lumber used in truss construction (more individual members and gusset plates per truss compared to a simple rafter), the additional labor involved in building and gusseting trusses before raising, and typically more roofing material needed to cover the additional roof surface area created by the two-slope design. The added cost is usually justified by the significant increase in usable interior storage volume the design provides. Use our shed cost calculator to compare a gambrel build against a gable roof for your specific shed size.
Ready for the Next Step?
Once your gambrel trusses are raised, braced, and sheathed, the next stage is roofing — underlayment, shingles or metal panels, and trim work across both roof slopes. Our roofing guides pick up exactly where this one leaves off.