 The floor frame is the foundation of everything that happens above it. Every wall you frame, every door you hang, and every roofline you cut references back to how square, level, and solidly built this stage turned out. It’s also one of the more approachable parts of a shed build — a handful of repeating joists, a rim around the perimeter, and a plywood deck on top.
This guide covers the complete process: selecting the right lumber, laying out and installing joists at the correct spacing, squaring the frame, and installing plywood decking. It picks up right after your foundation is complete — whether you built a gravel pad foundation or a concrete block foundation.
What You’ll Need
Materials
- Pressure-treated 2×6 lumber: For rim joists and floor joists on most standard sheds. Larger sheds may call for 2×8, per your specific plan.
- Joist hangers: Galvanized metal hangers connecting interior floor joists to the rim joists, sized to match your lumber dimension.
- 3/4″ tongue-and-groove plywood or OSB: For the floor deck surface. Tongue-and-groove edges lock adjacent sheets together for a stiffer, quieter floor.
- Joist hanger nails: Short, thick nails specifically designed for hanger connections — standard framing nails are too long and can blow through the hanger.
- 16d galvanized nails or 3″ exterior-rated screws: For rim joist connections and general framing.
- Construction adhesive: Applied to joist tops before decking goes down, reducing squeaks over the life of the floor.
- Deck screws or ring-shank nails: For fastening the plywood decking to the joists.
Tools
- Circular saw
- Framing square and speed square
- Tape measure
- 4-foot level and a longer straightedge
- Framing hammer or nail gun with compressor
- Chalk line
- Drill/driver, if using screws
Choosing Your Joist Size and Spacing
Joist size and spacing are determined primarily by the span they need to cover and the load they need to support. Wider spans and heavier expected floor loads (a workshop with stationary tools, for example) call for larger joists or tighter spacing than a basic storage shed.
| Joist Size | Typical Max Span | Common Use |
|---|---|---|
| 2×6 | Up to 8–9 ft (at 16″ O.C.) | Small to mid-size storage sheds |
| 2×8 | Up to 12 ft (at 16″ O.C.) | Larger sheds, light workshop use |
| 2×10 | Up to 15 ft (at 16″ O.C.) | Larger workshops, heavier floor loads |
These spans are general reference points, not engineering specifications — your specific shed plan will call out the exact joist size for your shed’s dimensions and intended use. Always follow your plan’s lumber schedule rather than estimating independently, since span capacity is affected by wood species and grade as well as size.
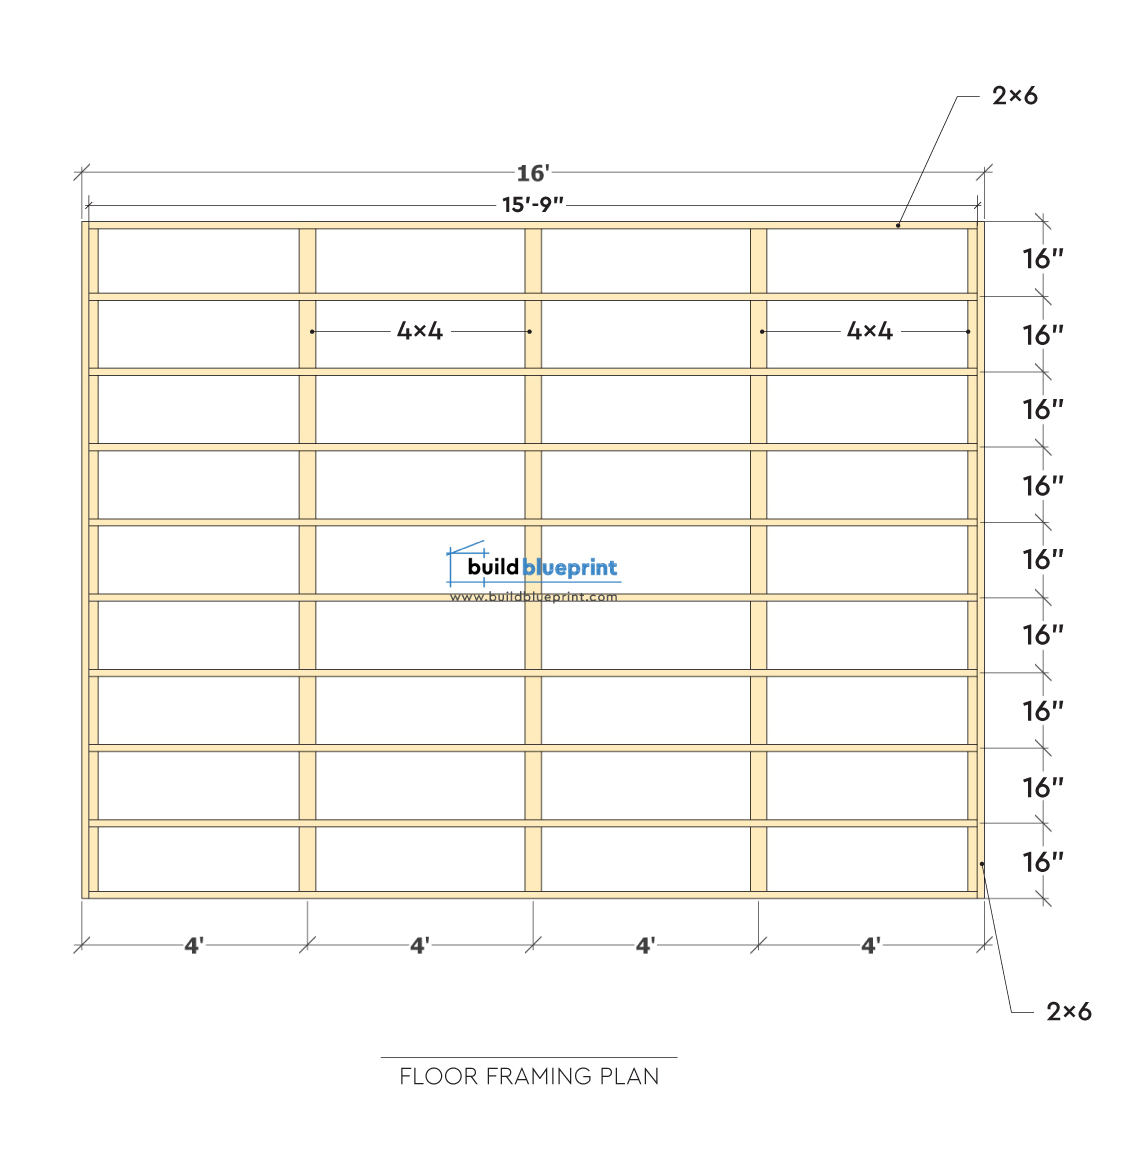
16 inches on center is the standard joist spacing for most DIY shed floor frames, matching standard wall stud spacing and plywood sheet dimensions so your decking lands on joist centers without extra cutting. Some larger or heavier-duty designs specify 12 inches on center for additional floor stiffness — check your plan’s specification before starting layout.
Step 1: Cut and Install the Rim Joists
The rim joist (sometimes called a band joist) forms the outer perimeter of the floor frame and is what your interior floor joists attach to at each end.
- Cut your rim joist lumber to length, matching the outer dimensions of your shed’s floor frame as specified in your plan.
- Position the two long rim joists along the outer edges of your foundation (skids, deck blocks, or beams), checking that they sit square to each other using the 3-4-5 method or by measuring diagonals once all four sides are in place.
- Fasten the rim joists to the foundation — to skids or beams with framing nails or structural screws, or to the tops of concrete deck block beams according to your plan’s connection detail.
- Add the two end rim joists, connecting them to the long rim joists at each corner with 16d galvanized nails or structural screws, toe-nailed or end-nailed depending on your plan’s specified connection method.
Once all four rim joists are connected, you have a complete rectangular perimeter — check the diagonals one more time before moving on to interior joist layout, since this is your last easy opportunity to correct any square error before joists start subdividing the frame.
Step 2: Lay Out Joist Positions
Accurate layout marking prevents the single most common floor framing mistake — joists that drift out of consistent spacing partway across the frame, which throws off your plywood decking layout later.
- Mark joist positions on both long rim joists simultaneously where possible, measuring from the same reference end on both sides so positions align exactly across the frame.
- Mark the first joist position at 15¼ inches from the reference end (accounting for the joist’s own 1.5-inch thickness), then continue marking every 16 inches after that — the same on-center logic used in wall stud layout.
- Use an X to indicate which side of each line the joist goes on, avoiding ambiguity when you’re installing joist hangers later.
- Double-check your final joist position against the rim joist length — the last joist should land close to, but not necessarily exactly at, the far end, depending on your plan’s specific layout.
Step 3: Install Joist Hangers
Joist hangers provide a secure, code-compliant connection between interior floor joists and the rim joists, and are strongly preferred over simply toe-nailing joists into the rim from an angle, which provides meaningfully less holding strength.
- Position each hanger at its marked layout line on the inside face of the rim joist, with the bottom of the hanger resting flush with the bottom edge of the rim joist so the joist sits at the correct height.
- Fasten the hanger to the rim joist using joist hanger nails in every hole provided — hangers are engineered to reach their rated strength only when fully nailed, so don’t skip holes to save time.
- Repeat at every marked position along both long rim joists.
Step 4: Install the Floor Joists
With hangers in place, cut and install the interior floor joists spanning between the two long rim joists.
- Cut each floor joist to length, matching the interior span between your rim joists as specified in your plan.
- Set each joist into its corresponding hanger, checking that the joist’s crown (a slight natural upward bow present in most dimensional lumber) faces up — this is standard framing practice, since the crown flattens out under load over time rather than causing a dip.
- Fasten each joist into its hanger using joist hanger nails through the hanger’s side flanges into the joist.
- Check that joist tops are level and consistent as you go, sighting down the frame periodically to catch any joist sitting noticeably higher or lower than its neighbors.
Step 5: Square the Full Frame
Before decking goes down, confirm the entire floor frame is square — this is your last practical opportunity to correct any accumulated error, since plywood decking will lock the frame’s shape in place once installed.
- Measure both diagonals of the completed frame, corner to corner. If the two measurements match, the frame is square.
- If the diagonals differ, apply gentle pressure to one corner of the frame (a helper pushing while you check the tape measure works well) to shift it slightly until the diagonals equalize.
- Once square, temporarily brace the frame if it will sit for any length of time before decking goes on — a diagonal brace nailed across two corners holds the square position until you’re ready to proceed.
Step 6: Install Plywood Decking
With the frame square and joists installed, the floor deck goes down in full sheets, laid perpendicular to the joists for maximum strength.
- Apply a bead of construction adhesive along the top of each joist before setting the first sheet — this step is optional but meaningfully reduces squeaking over the life of the floor, since it prevents small amounts of movement between the plywood and the joist from generating noise.
- Position the first sheet flush with one corner of the frame, with the tongue-and-groove edge oriented to accept the next sheet, and the sheet’s long edge running perpendicular to the joists.
- Fasten the first sheet with deck screws or ring-shank nails, spaced 6 inches apart along the edges and 12 inches apart in the field, driven into every joist the sheet crosses.
- Continue across the frame, engaging the tongue-and-groove edges of each new sheet with the previous one, and staggering end joints between rows similar to roof sheathing layout — so vertical seams in one row don’t align with the row before it.
- Cut sheets to fit at the frame’s edges where a full sheet doesn’t land evenly, using a circular saw for clean, straight cuts.
Common Mistakes to Avoid
Toe-nailing joists instead of using hangers. Toe-nailing (driving nails at an angle through the joist into the rim) is faster but provides meaningfully less structural strength than a properly installed joist hanger. Use hangers — the small additional cost and installation time is worth the improved connection strength.
Not checking crown orientation on joists. Installing joists with the crown facing down (rather than up) means the natural bow works against gravity rather than with it, which can cause a visible dip in the floor over time as the load compresses the frame. Always orient the crown up.
Skipping the square check before decking. Once plywood decking is fastened across the frame, the frame’s shape is essentially locked in. Confirm square with a diagonal measurement before any decking goes down — correcting an out-of-square frame after decking is installed means pulling fasteners and starting over.
Not staggering decking joints. Aligning plywood sheet joints from one row directly with the row before it creates a continuous seam across the floor, which is both a structural weak point and a more visible seam once the floor is finished. Stagger joints the same way you would on roof or wall sheathing.
Under-fastening the decking. Following the full nailing or screw schedule — not just the sheet edges — is what keeps the floor from developing squeaks and soft spots over time. Field fasteners into intermediate joists matter as much as edge fasteners.
Using non-pressure-treated lumber for rim joists and floor joists. Any framing member in a shed floor frame should be pressure-treated, ground-contact rated lumber, since the floor frame sits close to grade and is exposed to more moisture than the wall or roof framing above it.
Frequently Asked Questions
What size lumber should I use for a shed floor frame?
2×6 pressure-treated lumber is standard for most small to mid-size shed floor frames at 16 inches on center. Larger sheds or those spanning wider distances may call for 2×8 or 2×10 joists — always follow your specific plan’s lumber schedule, since span capacity depends on wood species and grade as well as size.
How far apart should floor joists be on a shed?
16 inches on center is the standard floor joist spacing for most DIY sheds, matching standard wall stud spacing and plywood sheet dimensions. Larger or heavier-duty designs sometimes specify 12 inches on center for additional floor stiffness — check your specific plan.
Do I need joist hangers for a shed floor?
Joist hangers are strongly recommended over toe-nailing for connecting floor joists to rim joists. They provide meaningfully better structural strength and are standard practice in residential floor framing, including for shed-scale structures.
What thickness plywood should I use for a shed floor?
3/4-inch tongue-and-groove plywood or OSB is the standard choice for shed floor decking at 16-inch joist spacing. The tongue-and-groove edges lock adjacent sheets together, producing a stiffer and quieter floor than square-edge sheets.
Why does my shed floor squeak?
Squeaking is usually caused by small amounts of movement between the plywood decking and the joists beneath it, often from under-fastening or skipping construction adhesive during installation. Applying adhesive to joist tops before decking and following a full fastening schedule — not just at sheet edges — largely prevents this.
Should floor joist crowns face up or down?
Crown up. Dimensional lumber typically has a slight natural upward bow along its length. Installing joists with the crown facing up means the bow flattens out under load over time, rather than working against gravity and causing a visible dip in the finished floor.
Ready for the Next Step?
With your floor frame squared, decked, and ready to build on, the next stage is wall framing — and every plan on this site picks up exactly here.